Air Dry Clay Christmas Ornament
Learn how to make air dry clay Christmas ornaments with this easy tutorial! These are a great easy Christmas craft for all ages!
Ingredients
- Air dry clay
- Acrylic clay rolling pin (or you can use a regular rolling pin)
- Drinking straw
- Christmas cookie cutters
- Jute twine
- Waxed paper or parchment paper
Instructions
- First, remove a small amount of clay from the package. Close the package so the remaining clay doesn’t dry out.
- Roll the clay out on a smooth surface (I used a marble pastry board). You don’t want the clay too thin or too thick. About 1/4″ thick is what I aim for.If it’s too thick, it will take longer to dry. But if it’s too thin, the ornaments tend to curl up at the edges, and they break more easily.
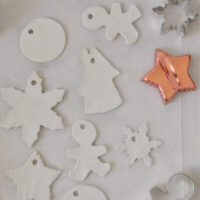
- Press a cookie cutter into the rolled out clay.
- Pull up the clay around the cookie cutter (after pressing it into the clay), removing all the clay around the edges.
- Use a drinking straw to make a hole at the top of the ornament. This is the hole for the hanger (jute twine, ribbon, or string). Press the straw all the way through the clay.
- Carefully loosen the clay from the surface it was rolled out on, and transfer it to a piece of waxed paper or a cookie sheet to dry.
- Allow the clay to dry undisturbed for about a day. Then turn it over and allow the other side to dry for another day. The clay will be grayish in color at first, but it whitens as it dries.
- After the clay has dried and hardened, cut a piece of jute twine (or ribbon) and tie to make a hanger.