Easy Sourdough Bread Recipe
This easy sourdough bread recipe is perfect for beginners. This is my everyday artisan loaf that I often make at least once a week.
Servings: 12 slices
Calories: 152kcal
Equipment
- Glass mixing bowl mine is 2.5 quart
- Banneton proofing basket (9" size)
- Plastic bench scraper (optional)
Ingredients
- 60 g active sourdough starter (scant 1/2 cup)
- 340 g water (1 1/2 cup)
- 490 g bread flour (about 3 1/2 cups)
- 10 g salt (1 1/2 tsp)
Instructions
- First, you'll want to make sure that your sourdough starter is very active. I keep my sourdough starter in the fridge usually, so when I want to make a loaf of bread, I remove it from the fridge and let it sit at room temperature for awhile. And then I feed it.If it's been awhile since I last used my starter, I'll sometimes feed it a few times before mixing up my sourdough bread recipe. You want it to be in its active, bubbly state before adding it to the other ingredients.
- In a large bowl, weigh out your sourdough starter. Use the tare function on your scale so that you're not including the weight of the bowl.
- Add the water to the sourdough starter in the bowl, and mix them together gently using a dough whisk, fork, or spoon.
- Add the bread flour and salt to the sourdough starter/water mixture.
- Whisk all the ingredients together in the mixing bowl gently. Then use your hands to gently mix all the ingredients together. Scrape any dough off the sides of the bowl if necessary. Cover the bowl with a piece of plastic wrap, a bowl cover, or a damp tea towel, and let the dough rest for an hour.
- After an hour, it's time to start a series of stretches and folds. Dip your fingers in a bowl of clean water and grab a section of dough between your thumb and forefingers and pull gently upwards. Stretch and fold it over to the opposite side of the bowl. Then turn the bowl slightly and pick up another section of dough and repeat the stretching and folding technique. Continue stretching and folding all around the bowl until the dough forms a ball.
- Cover the bowl with the plastic wrap or other covering and allow it to sit for about another hour. (If you're short on time, you can do a series of stretches and folds every 30 minutes or so. Usually, I do about an hour in between sets.)
- Repeat the stretching and folding 3 more times for a total of 4 times, covering and allowing to rest after each stretch-and-fold session. After the fourth and last set of stretches and folds, cover the dough with the plastic wrap or other covering.
- Allow the covered dough to sit at room temperature, undisturbed, for 8-10 hours.* This is what is called bulk fermentation. After this time is up, your dough should have doubled in size, and there will probably be visible bubbles on the top and throughout the dough. *This timing will work well if your kitchen is around 65 to 68 degrees F. If your kitchen temperature is higher, you will want to watch your dough closely, as it won't take as long. In very warm months, or in the winter with central heat, it may only take a few hours.
- Prepare your banneton basket by dusting it with flour (I use rice flour, but you can also use all-purpose) to keep the dough from sticking. Set the banneton aside for the moment.
- Reach into the bowl of risen dough, and gently peel away one edge with your fingers. Grab this loosened section of dough between your thumb and forefingers as you did before for the stretches and folds. Do the same stretching and folding technique except you don't need to lift the dough up very high this time. You're only trying to gather the dough into a ball. So grab one section and stretch it gently up and over to the other side of the bowl, then turn the bowl and repeat with another section of dough until you have formed a smooth ball of dough. Be very gentle and don’t try to pop all of the bubbles that have formed.
- Place your hand over the dough in the bowl, and gently transfer the dough from the bowl into your hand. Then gently put the dough ball, rounded side down, seam side up, into the banneton. Be very gentle with this step so you don’t deflate your dough.
- Sprinkle a bit of rice flour on the top of the dough and around the sides of the dough, if necessary, to keep it from sticking to the banneton and the plastic wrap or other covering you put over it.
- Cover the banneton basket with plastic wrap (I use the same piece that was used for the bulk fermentation period) or other covering. I use a piece of plastic wrap with a large rubber band to hold it on, but a plastic shower cap would also work well.
- Put the banneton basket with the dough in the fridge for 3-4 hours or more. Sometimes I leave it for just a few hours (a minimum of 3), but I’ve also left it overnight and it has worked out well. This is the final proofing.
- After the final proofing in the refrigerator, prepare your cast iron Dutch oven or other covered baking pan. Cut a piece of parchment paper large enough to fit inside your Dutch oven with extra on the sides so you can easily get your bread into and out of the hot pan. Set the parchment paper aside for now. Preheat the oven to 450 degrees F with the Dutch oven inside the oven so that they preheat together.*
- When the oven is about the right temperature, remove the dough from the fridge and take off the covering of plastic wrap or whatever you used to cover it.
- Once the oven has reached 450 degrees, take the piece of parchment paper you cut earlier and put it on top of the dough in the banneton basket.
- Put one hand on top of the dough and with the other hand pick up the basket and gently turn over the basket so the dough turns upside down onto the piece of parchment paper.
- Gently set the whole thing (basket, dough, and parchment paper) down on the counter. Slowly and gently remove the banneton basket and set it aside. If you have clumps of flour resting on the dough, gently smooth the top of the dough with your hand.
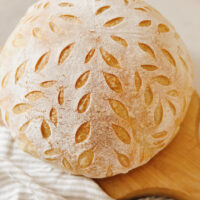
- Now it’s time to score the dough. Using a bread lame or a razor blade, score the top of the dough with your chosen design. If you’re a beginner, you can simply make an “x” or a cross shape, or make some simple leaves.
- Remove the hot Dutch oven from the heated oven, using oven mitts, and remove the lid. Grab the parchment paper by the edges and lower your sourdough bread into the heated Dutch oven and replace the lid.
- Bake for 50 minutes. Do not remove the lid or open the oven during this time. When your timer goes off, check on your bread. If it isn’t brown enough yet, remove the lid and bake for another 5-10 minutes.
- Finally, after the cooking time is up, remove the loaf from the Dutch oven and allow to cool on a wire rack. It’s best to wait at least an hour, after the loaf has fully cooled, before slicing. Enjoy!
Notes
*Even though I’ve included instructions for using a preheated oven, I usually don’t preheat my oven before baking, and my bread has always turned out well. The bread in the photos in this post was baked without preheating.
Here are the instructions for how to bake this sourdough bread recipe without preheating the oven first.
After scoring the bread dough, lower the parchment paper with dough on it down into the Dutch oven and put on the lid.
Put the Dutch oven into the cold oven and turn oven on and set the temperature to 450 degrees F. Set a timer for 55 minutes, starting the timer as soon as you have set your oven temperature. Bake for 55 minutes with the lid on (do not lift the lid or open the oven during this time). When the timer goes off, check on your bread. It may need another 5-15 minutes in the oven with the lid off to get it perfectly browned.
Remove the finished loaf from the Dutch oven and allow to cool on a wire rack.
©ArtfulHomemaking.com. Content and photographs are copyright protected. Sharing of this recipe is both encouraged and appreciated. Copying and/or pasting full recipes to any social media is strictly prohibited.
Find more sourdough recipes at www.artfulhomemaking.com
If you make this recipe and enjoy it, tag me on Instagram @artfulhomemaking and let me know!
Nutrition
Calories: 152kcal | Carbohydrates: 31g | Protein: 5g | Fat: 1g | Saturated Fat: 0.1g | Polyunsaturated Fat: 0.3g | Monounsaturated Fat: 0.1g | Sodium: 325mg | Potassium: 41mg | Fiber: 1g | Sugar: 0.1g | Vitamin A: 1IU | Calcium: 7mg | Iron: 0.4mg
