This post may contain affiliate links. Please read our disclosure policy.
This easy sourdough bread recipe is perfect for beginners. But even after you’ve mastered the art of sourdough, you’ll still return to this recipe again and again!
This is my everyday artisan loaf that I often make at least once a week. Whenever you want fresh sourdough bread that’s as beautiful as it is delicious, give this recipe a try.
My Sourdough Journey
When I made my first sourdough starter over 15 years ago, there wasn’t much information available to help me.
I had the Nourishing Traditions book, and I followed the recipe for making a rye sourdough starter. But I didn’t know what to do with it after that. (Need a sourdough starter? Find out how to make a from-scratch sourdough starter here.)
But I knew from my research that sourdough is healthier than regular bread, so I was determined to learn how to make it myself.
It took me a long time to figure out what I was doing, but once I finally got it, there was no turning back.
My first few sourdough bread creations weren’t that great. But after months of making sourdough pancakes, sourdough English muffins, sourdough biscuits, and sourdough tortillas, I was finally ready to move on to making bread.
Now I love making sourdough bread for my family almost every week. The recipe that I’m sharing with you today is my favorite easy sourdough bread recipe. After all the trial and error, I finally have a recipe that works perfectly for me every time!
The Best Sourdough Bread Recipe
This sourdough bread recipe is my favorite when I want an artisan loaf (here’s an easy sourdough sandwich bread recipe). It’s so easy, and it turns out every time.
This simple sourdough bread recipe is really not complicated. But because there are a lot of steps and details, that may make it appear more difficult than it actually is.
Sourdough bread does require a bit of time and patience, but once you have the steps down, it won’t require as much thought or planning.
I’m going to give you as many details and helpful tips in this post as I possibly can. I want you to be successful with this basic sourdough bread recipe!
Why You’ll Love This Sourdough Bread Recipe
One of the main reasons I love this recipe is that I haven’t had it fail me. It always works to give me a beautiful loaf of bread.
And even though there are many other types of sourdough bread (sandwich bread, rolls, cinnamon rolls, etc.), there’s something so therapeutic about making artisan sourdough bread. The whole process, from start to finish, is slow, simple, and peaceful once you get the hang of it.
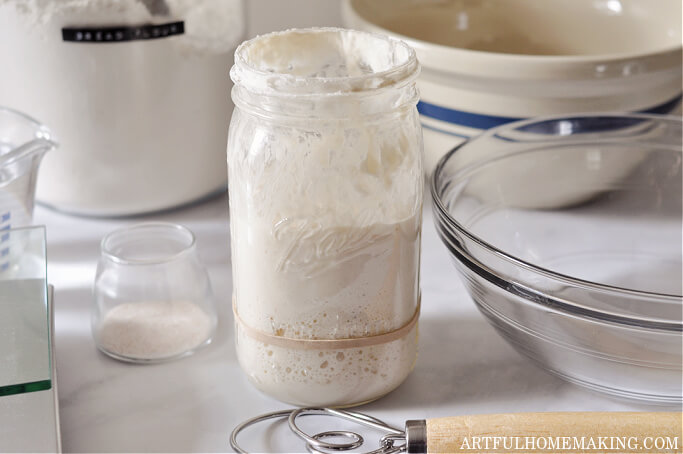
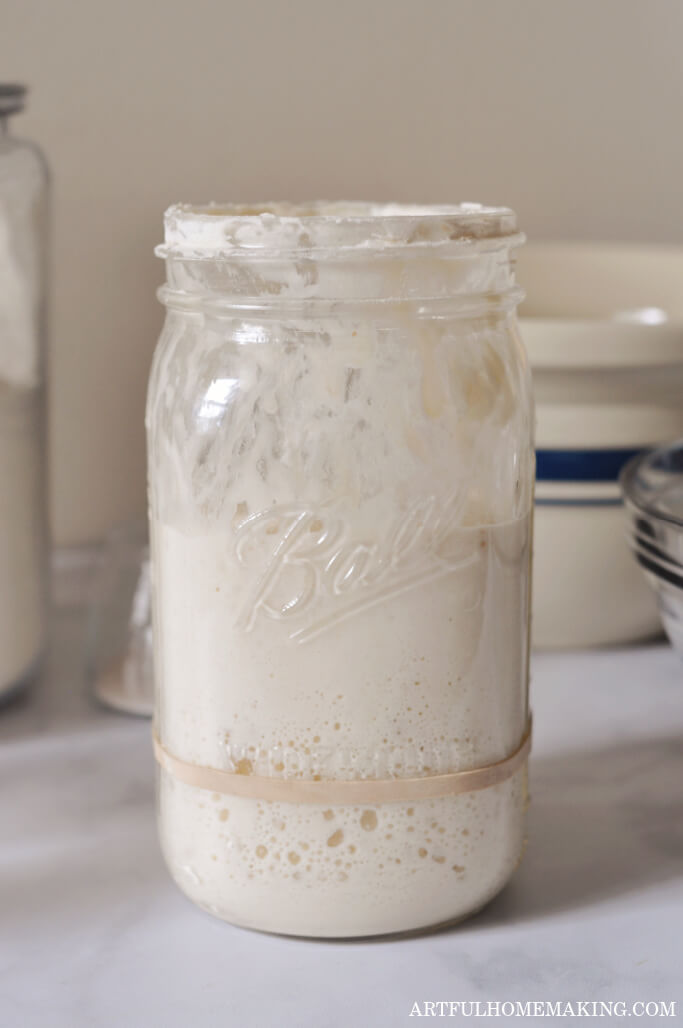
I love watching my active starter growing in preparation for making the bread. I love mixing up the simple ingredients and doing the stretches and folds.
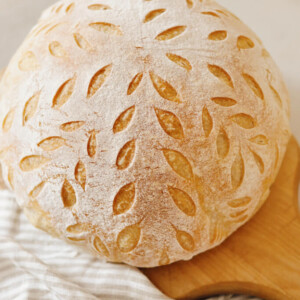
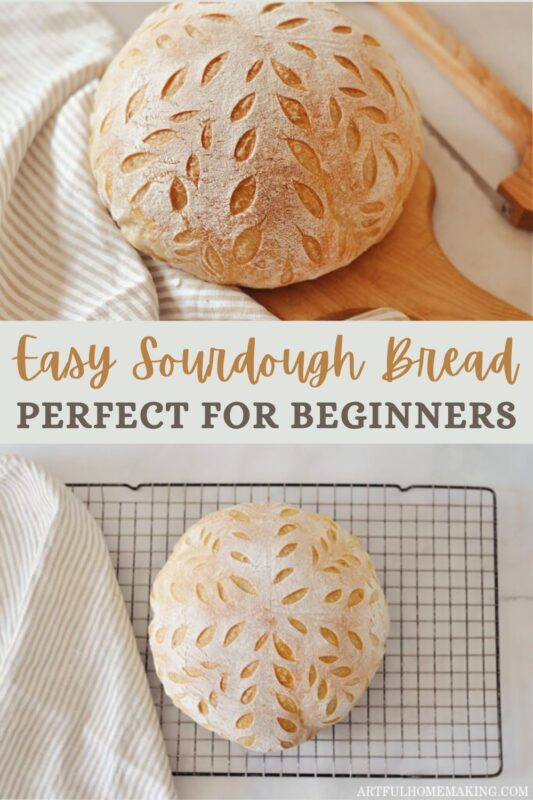
And I love watching the bread rise, shaping the dough, scoring a pattern on the dough, and then the excitement of opening the oven to see the work of art that is sourdough.
I just love everything about it! And this recipe is the one I use when I want an artistic, beautiful loaf of bread. I hope it becomes a staple in your kitchen as it has in mine.
This sourdough bread recipe only makes one boule, which is perfect for beginners. It will enable you to get a handle on the process of making sourdough bread without having to deal with two loaves/boules.
Affiliate links included below, which means I may make a small commission at no extra cost to you. Read my disclosure here.
Supplies You’ll Need
Large mixing bowl: There are so many options when it comes to mixing bowls. I love the look of stoneware bowls like this one. I happened to find one of these at a flea market, and I just love it!
However, for beginners, it can be very helpful to use a glass mixing bowl (this is the one I have—it’s the 2.5 qt). This way you can see the action happening with your dough.
You’ll be able to see the bubbles forming as the sourdough starts to rise, and you can easily see how much the dough has risen after the rising time.
Digital scale: In this recipe I use a digital scale because the re
sults are so much more predictable than when you’re using cup measurements. It took me some time to realize that the scale was not at all something to feel intimidated by. It’s actually super helpful for giving you the results you’re hoping for every time, especially when you’re just starting out.
Dough whisk (or a fork or spoon): I have a dough whisk that I love using to mix up my sourdough bread ingredients. However, it’s not totally necessary. Using a fork is just as easy and effective. Most of the mixing is done with your hands anyway.
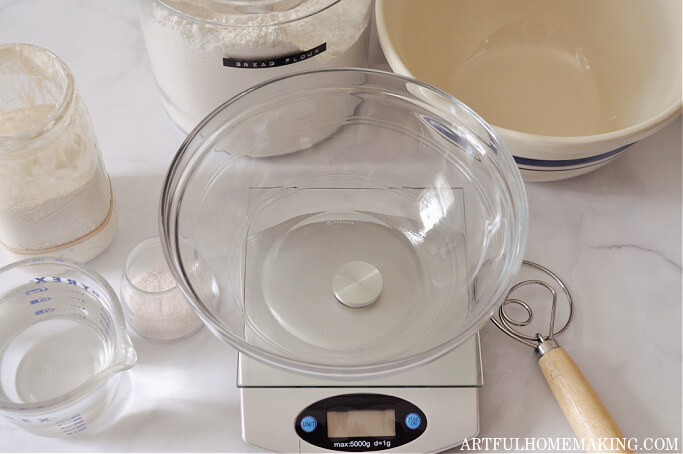
Plastic scraper: I use this bowl scraper when I’m first mixing up the dough and then later to loosen the dough to get it out of the bowl (before putting it in the banneton basket).
Rice flour: I use rice flour for dusting my banneton and for dusting the dough prior to scoring the bread.
Banneton proofing basket or a bowl: A banneton proofing basket is very useful to have for making sourdough bread. (This is the one I have, and it comes with the liner and plastic scraper.) I use a 9″ proofing basket for this recipe.
But, like most of these tools, other items will work. You can use a round basket or a mixing bowl lined with a tea towel, and that works just as well.
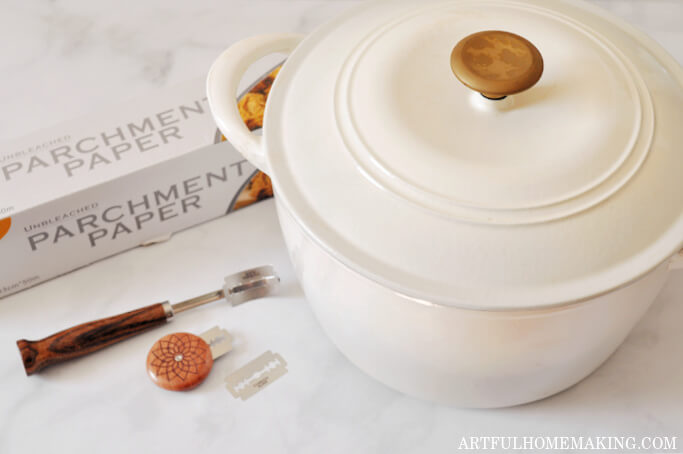
Enameled cast iron Dutch oven: A Dutch oven is a standard piece of recommended equipment when you’re getting started with sourdough bread making. But it’s not required. Any baking dish or pan with a lid will work.
Plastic wrap, beeswax wrap, or a tea towel: You need something to cover your dough with during the various stages of making bread. Either of these will work.
I used to use a damp tea towel, but then I discovered that plain old plastic wrap actually works better for me. Pick whichever you prefer. Another option is to use a reusable bowl cover or a plastic shower cap.
The great thing about these (just like using a damp kitchen towel or beeswax wrap) is that they can be reused over and over again.
Parchment paper: A piece of parchment paper is necessary for transferring your dough to the Dutch oven.
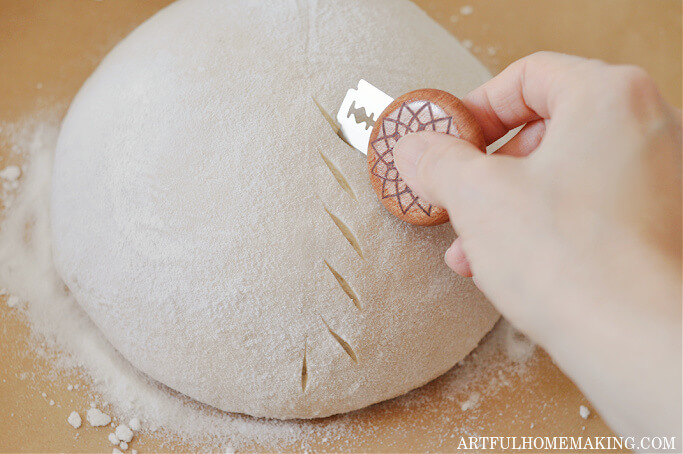
Bread lame or razor blade: The bread lame or razor blade is what you will use to score your dough before baking it. There are several different kinds to choose from. I have this bread lame and this UFO lame.
Ingredients
You’ll only need four ingredients to make this easy sourdough bread recipe! Find the amounts and detailed instructions in the recipe card at the bottom of this post.
- Active sourdough starter (go here to learn how to make one)
- Water
- Bread flour (unbleached bread flour)
- Salt
Notes About the Ingredients
Active sourdough starter: you need a mature sourdough starter for this sourdough bread recipe. You can either make your own (find out how to make a homemade sourdough starter here) and feed it for awhile until it becomes mature, buy one that’s already mature, or get one from a friend.
Your starter needs to be strong in order to make the dough rise. For tips regarding testing your starter for maturity, see the FAQ below.
Water: I use filtered water from our Berkey water filter whenever I’m making sourdough bread. However, I know many people who just use tap water. Use whatever you’re comfortable with, and what you have available.
Bread flour: Bread flour has more protein than all purpose flour, so I recommend using bread flour for your bread, at least when you’re a beginner.
The protein in the flour is what helps the gluten to form, so it helps make your bread dough stronger and helps the bread rise. If you only have all purpose flour, however, that can also work just as well.
Salt: I use this sea salt, but any salt can be used.
How to Make This Easy Sourdough Bread Recipe
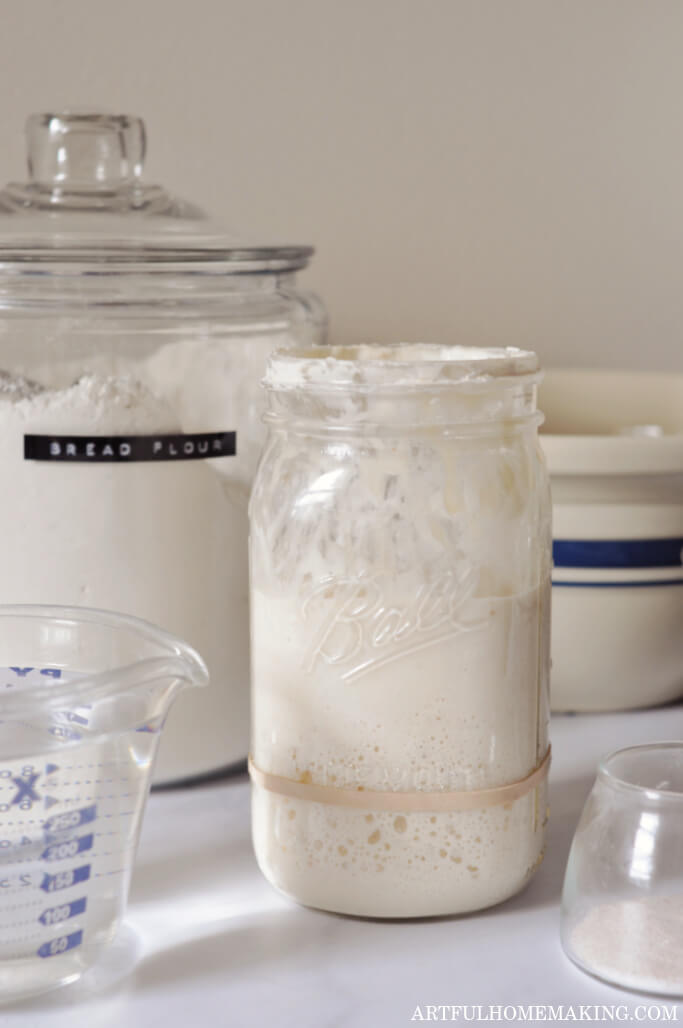
First, you’ll want to make sure that your sourdough starter is very active.
I keep my sourdough starter in the fridge usually, so when I want to make a loaf of bread, I remove it from the fridge and let it sit at room temperature for awhile. And then I feed it.
If it’s been awhile since I last used my starter, I’ll sometimes feed it a few times before mixing up my sourdough bread recipe. You want it to be in its active, bubbly state before adding it to the other ingredients.
Step-by-Step Instructions:
Now I’m going to give you the step-by-step instructions I use to make this sourdough bread recipe.
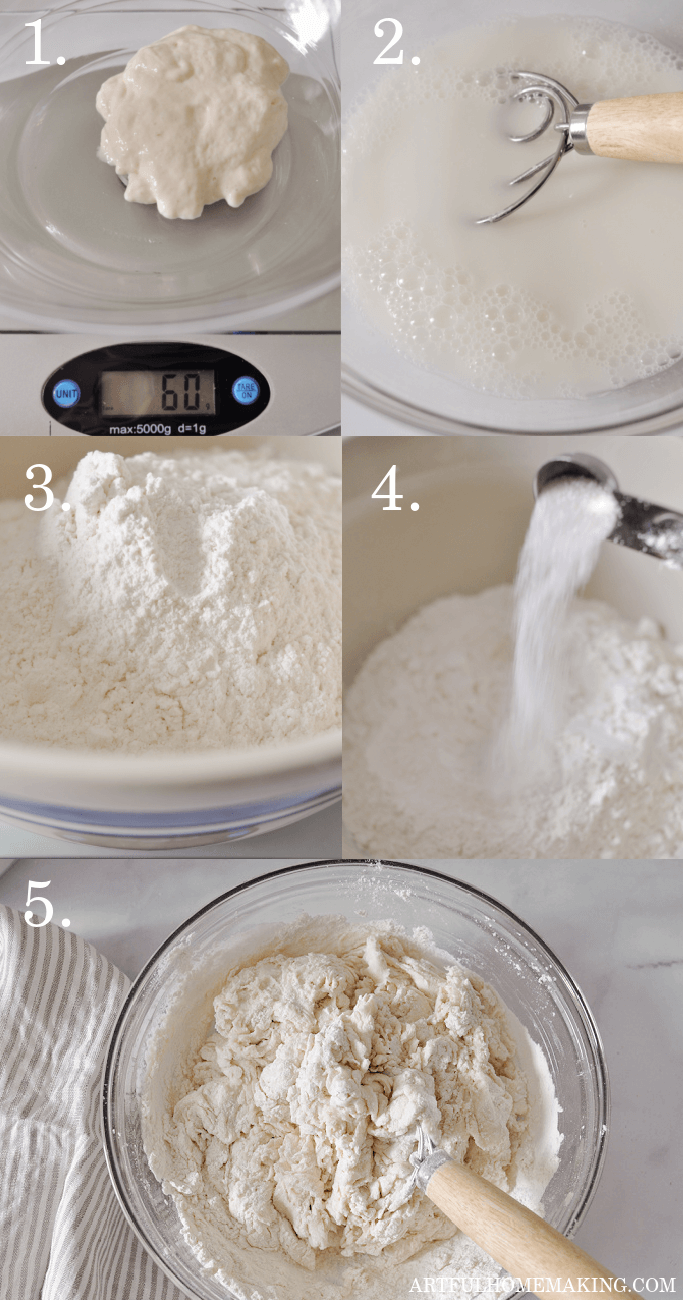
1. In a large bowl, weigh out your sourdough starter. Use the tare function on your scale so that you’re not including the weight of the bowl.
I actually like to weigh out my ingredients in separate bowls, being sure to use the tare function each time.
But you can also weigh the starter in the bowl, press the tare button, then add the water to the bowl, press the tare button, and then add the flour.
(I just use a teaspoon to add the salt, rather than weighing it.)
2. Add the water to the sourdough starter in the bowl, and mix them together gently using a dough whisk, fork, or spoon.
3. Add the bread flour and salt to the sourdough starter/water mixture.
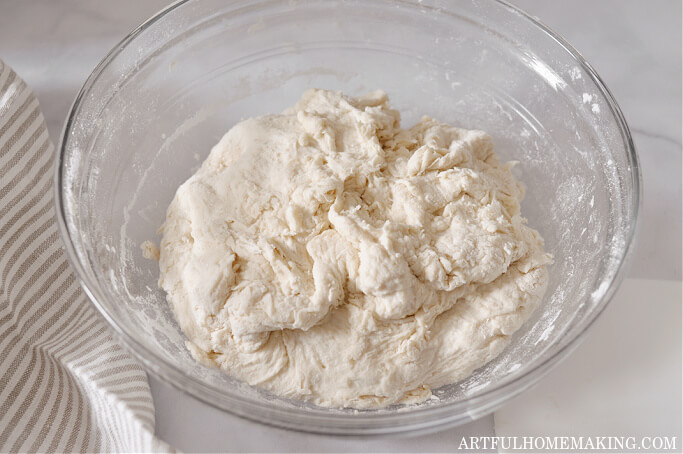
4. Whisk all the ingredients together in the mixing bowl gently. Then use your hands to gently mix all the ingredients together. Scrape any dough off the sides of the bowl if necessary.
5. Cover the bowl with a piece of plastic wrap, a bowl cover, or a damp tea towel, and let the dough rest for an hour.
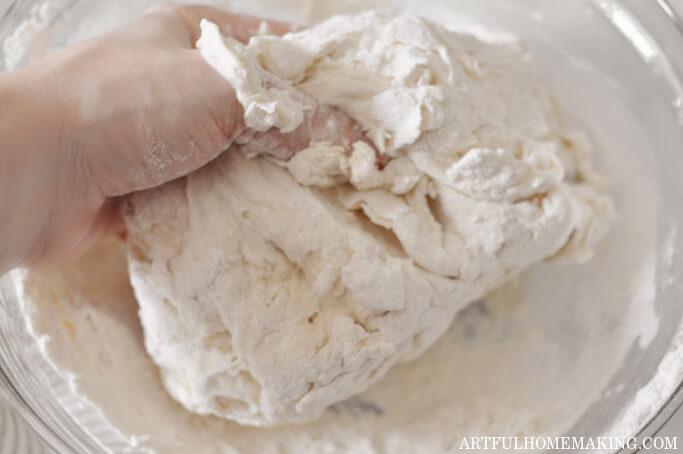
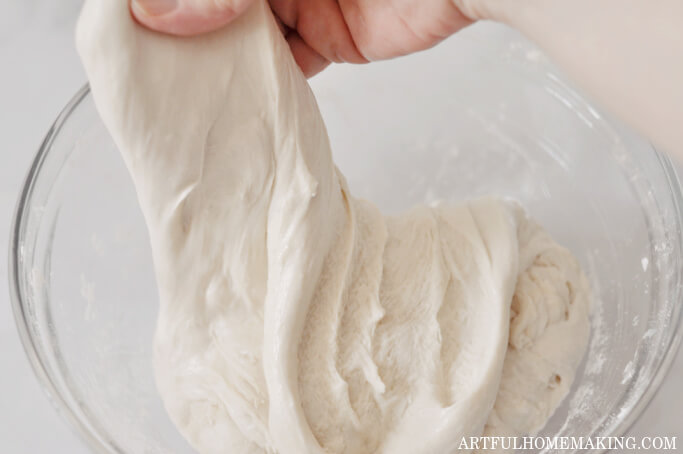
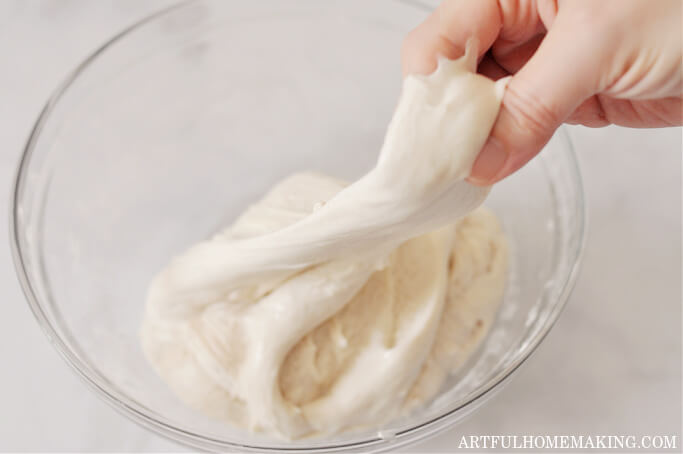
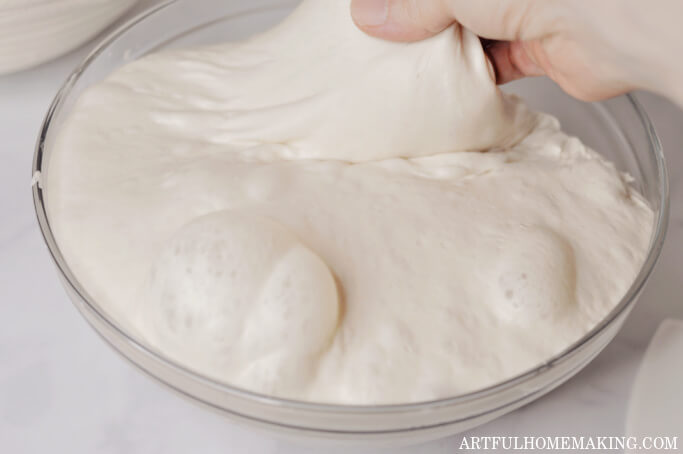
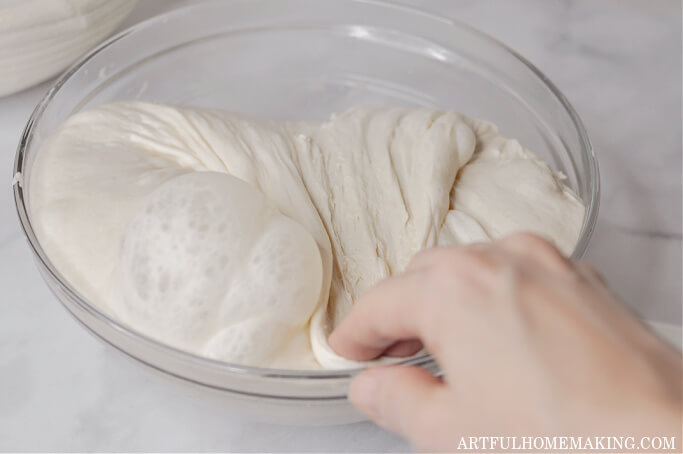
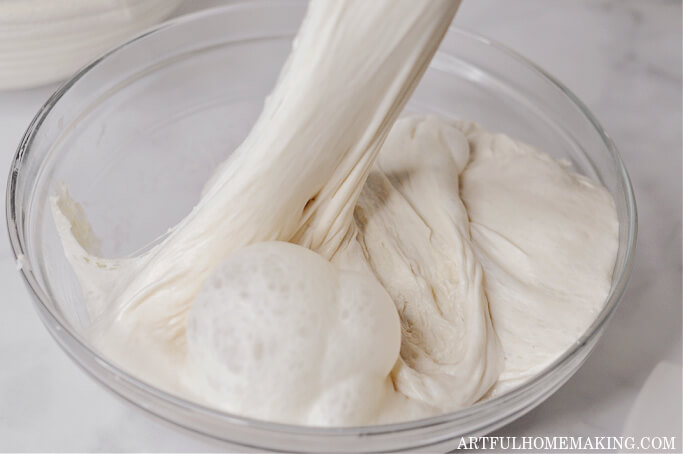
6. After an hour, it’s time to start a series of stretches and folds. Dip your fingers in a bowl of clean water and grab a section of dough between your thumb and forefingers and pull gently upwards.
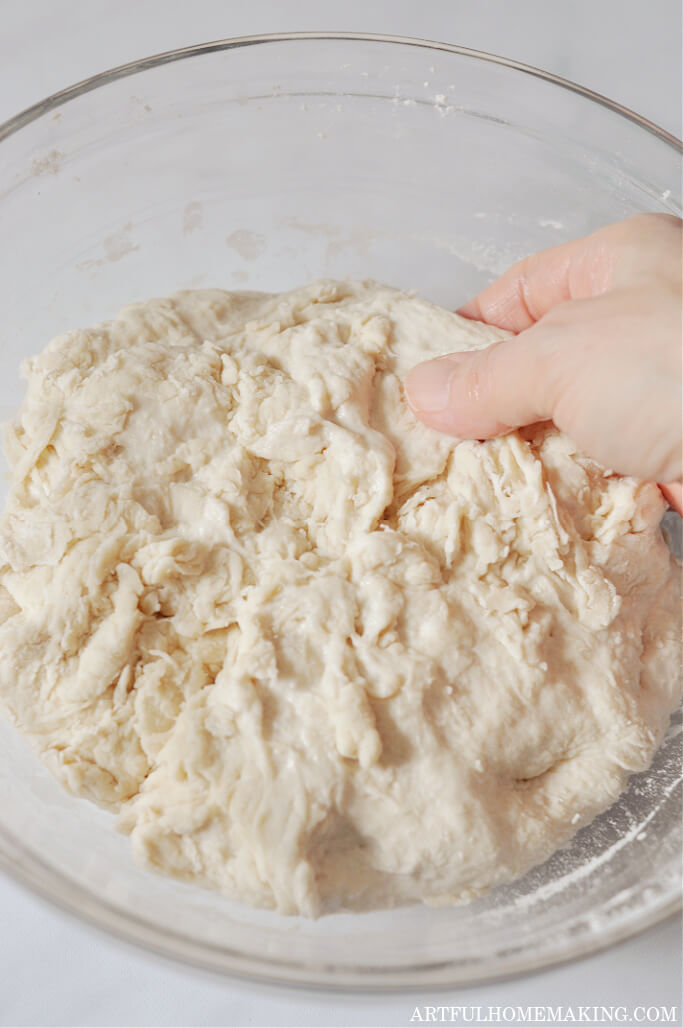
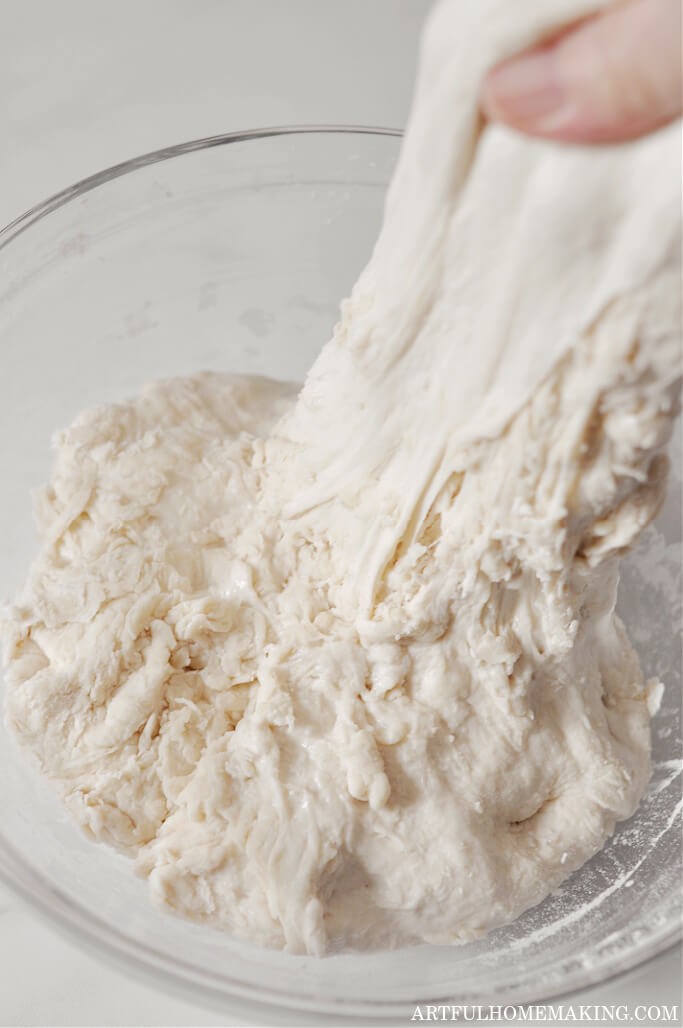
Stretch and fold it over to the opposite side of the bowl. Then turn the bowl slightly and pick up another section of dough and repeat the stretching and folding technique.
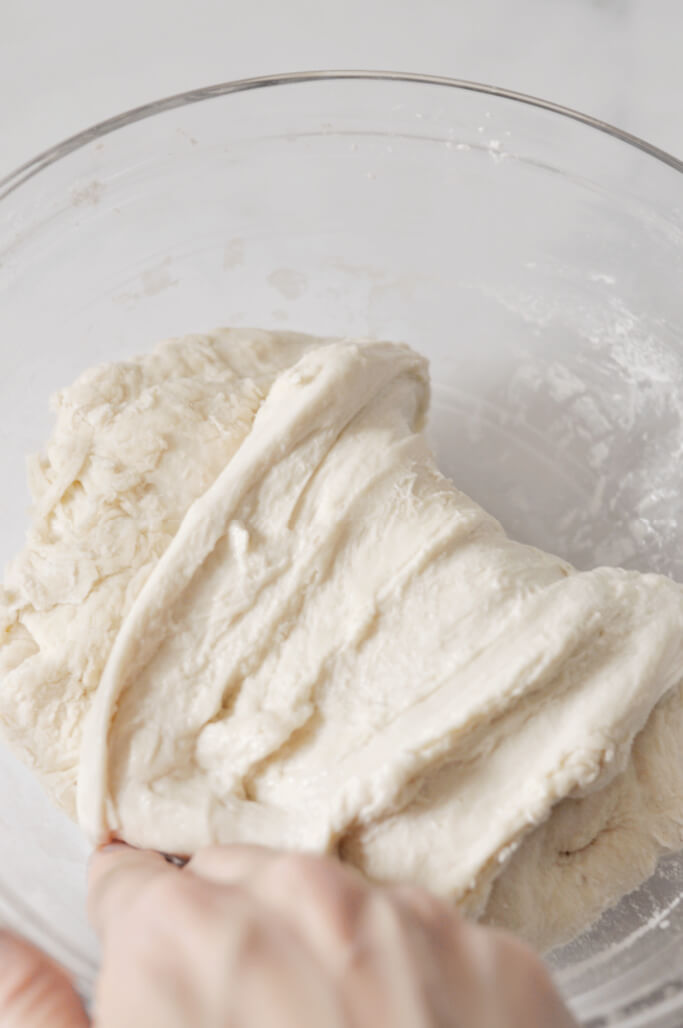
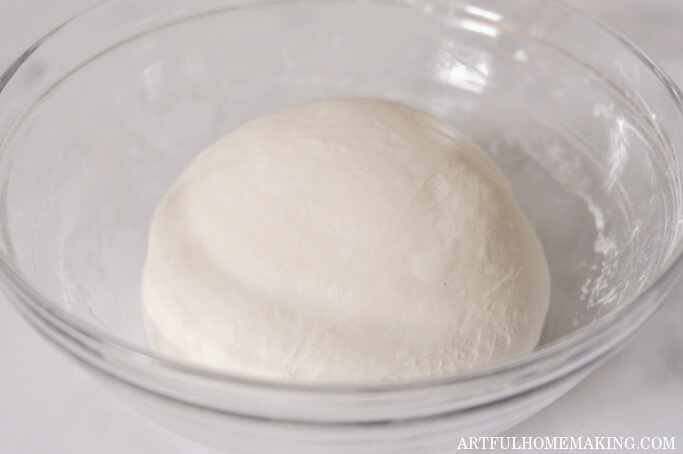
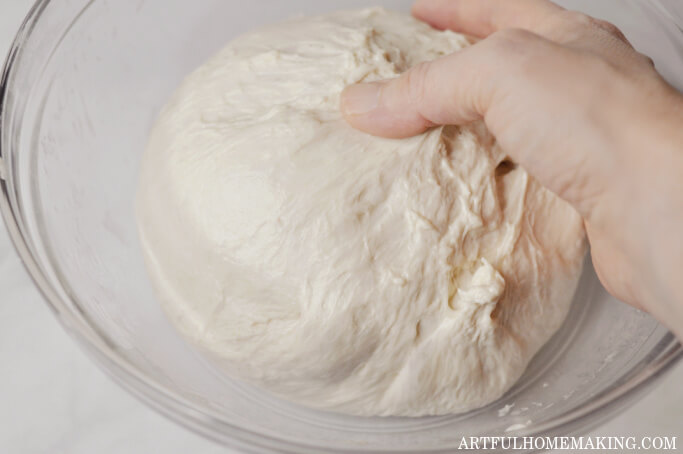
Continue stretching and folding all around the bowl until the dough forms a ball.
7. Cover the bowl with the plastic wrap or other covering and allow it to sit for about another hour.
(If you’re short on time, you can do a series of stretches and folds every 30 minutes or so. Usually, I do about an hour in between sets.)
I put a piece of masking tape on the bowl cover and make a mark on the tape for each set of stretch and folds. This isn’t a necessary step, but I don’t like trying to remember where I’m at in the process, so this makes it easy for me and frees my mind from one more thing!

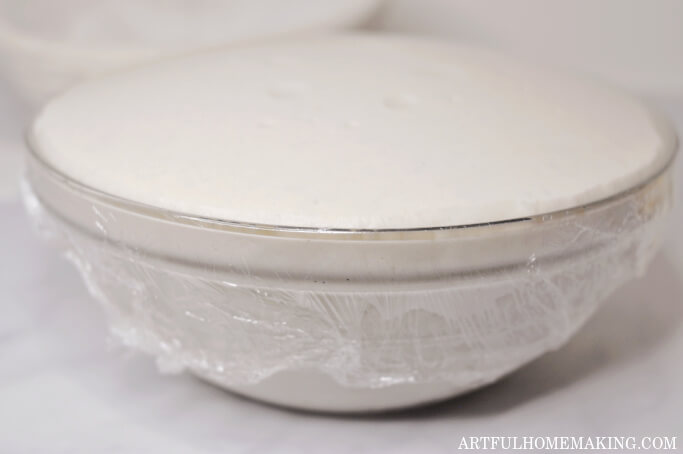
8. Repeat the stretching and folding 3 more times for a total of 4 times total, covering and allowing to rest after each stretch-and-fold session.
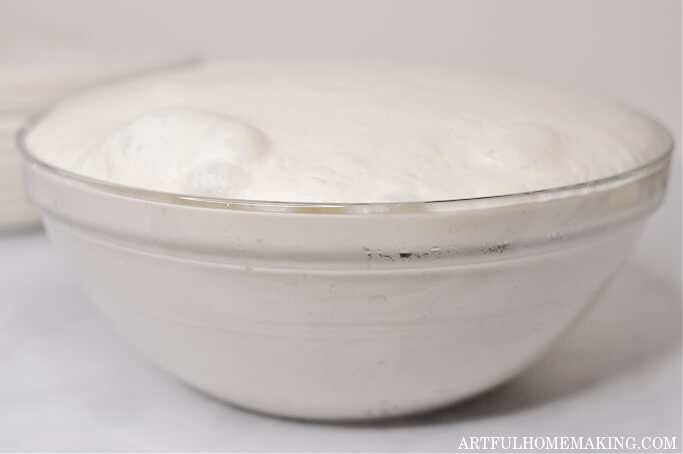
9. Allow the covered dough to sit, undisturbed, for 8-10 hours. This is what is called bulk fermentation.
After this time is up, your dough should have doubled in size, and there will probably be visible bubbles on the top and throughout the dough.
10. Prepare your banneton basket by dusting it with flour (I use rice flour) to keep the dough from sticking. Set the banneton aside for the moment.
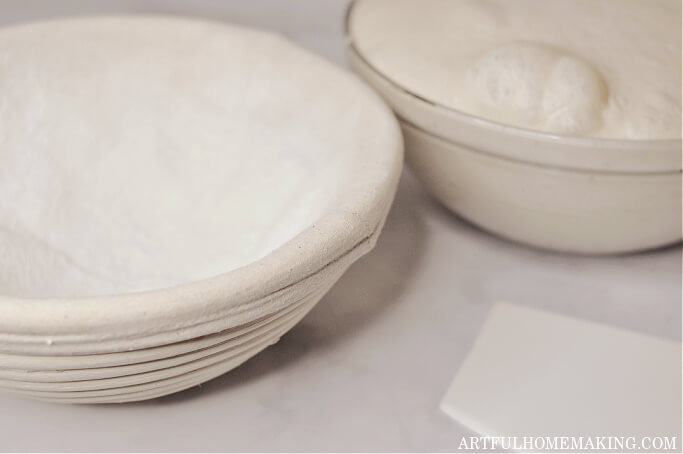
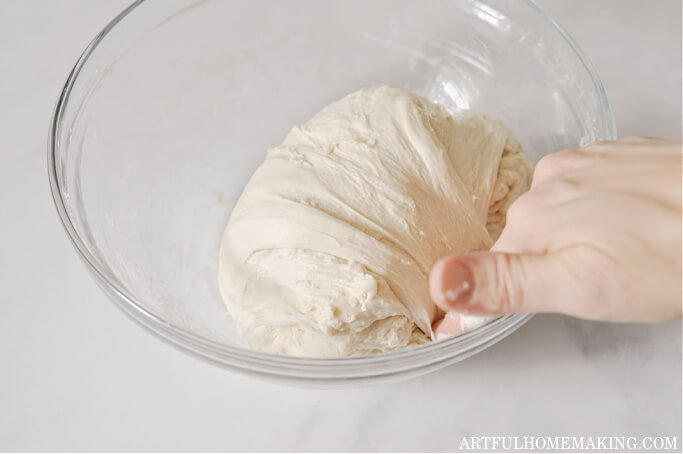
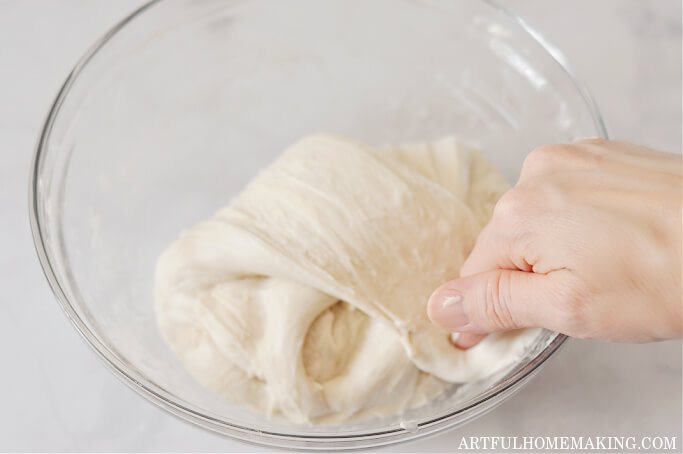
11. Reach into the bowl of risen dough, and gently peel away one edge with your fingers. Grab this loosened section of dough between your thumb and forefingers as you did before for the stretches and folds.
Do the same stretching and folding technique except you don’t need to lift the dough up very high this time. You’re only trying to gather the dough into a ball.
So grab one section and stretch it gently up and over to the other side of the bowl, then turn the bowl and repeat with another section of dough until you have formed a smooth ball of dough.
Be very gentle and don’t try to pop all of the bubbles that have formed.
12. Place your hand over the dough in the bowl, and gently transfer the dough from the bowl into your hand. Then gently put the dough ball, rounded side down, into the banneton. Be very gentle with this step so you don’t deflate your dough.
13. Sprinkle a bit of rice flour on the top of the dough and around the sides of the dough, if necessary, to keep it from sticking to the banneton and the plastic wrap or other covering you put over it.
14. Cover the banneton basket with plastic wrap (I use the same piece that was used for the bulk fermentation period) or other covering. I use a piece of plastic wrap with a large rubber band to hold it on (we just happened to have this large rubber band, and it works well).
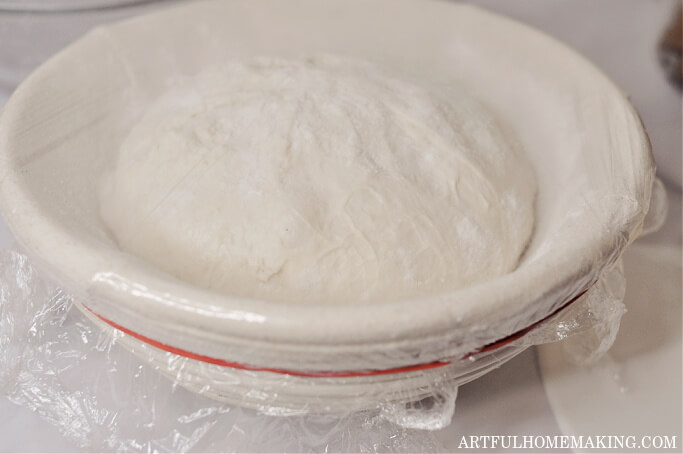
15. Put the banneton basket with the dough in the fridge for 3-4 hours or more. Sometimes I leave it for just a few hours (a minimum of 3), but I’ve also left it overnight and that works too. This is the final proofing.
How to Bake Sourdough Bread
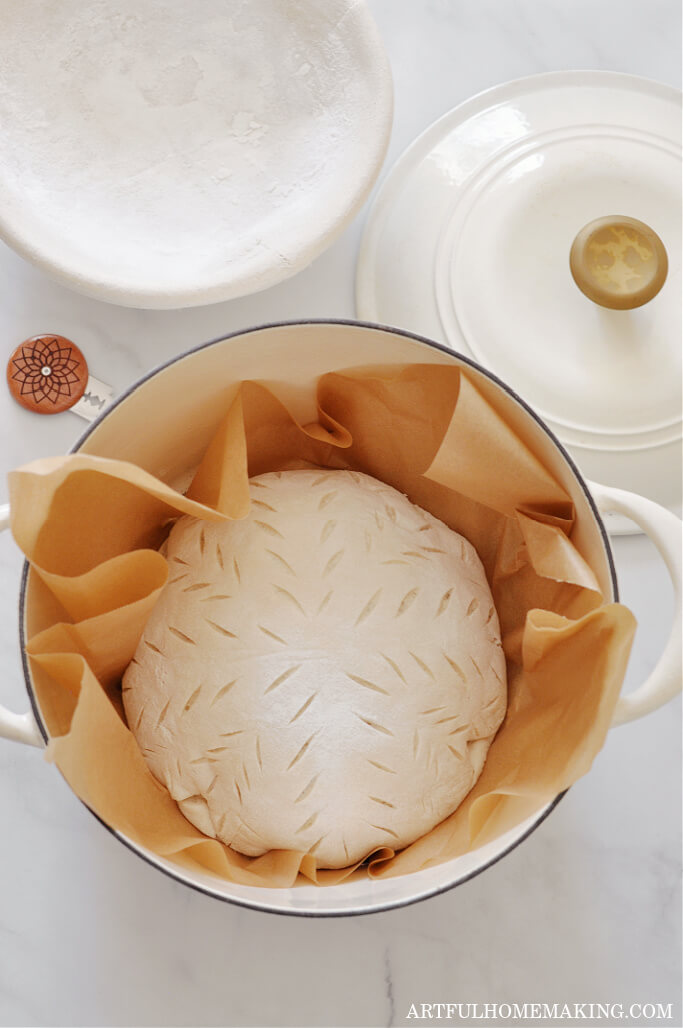
After the final proofing in the refrigerator, prepare your cast iron Dutch oven or other covered baking pan.
Cut a piece of parchment paper large enough to fit inside your Dutch oven with extra on the sides so you can easily get your bread into and out of the hot pan. Set the parchment paper aside for now.
Preheat the oven to 450 degrees F with the Dutch oven inside the oven so that they preheat together.*
When the oven is about the right temperature, remove the dough from the fridge and take off the covering of plastic wrap or whatever you used to cover it.
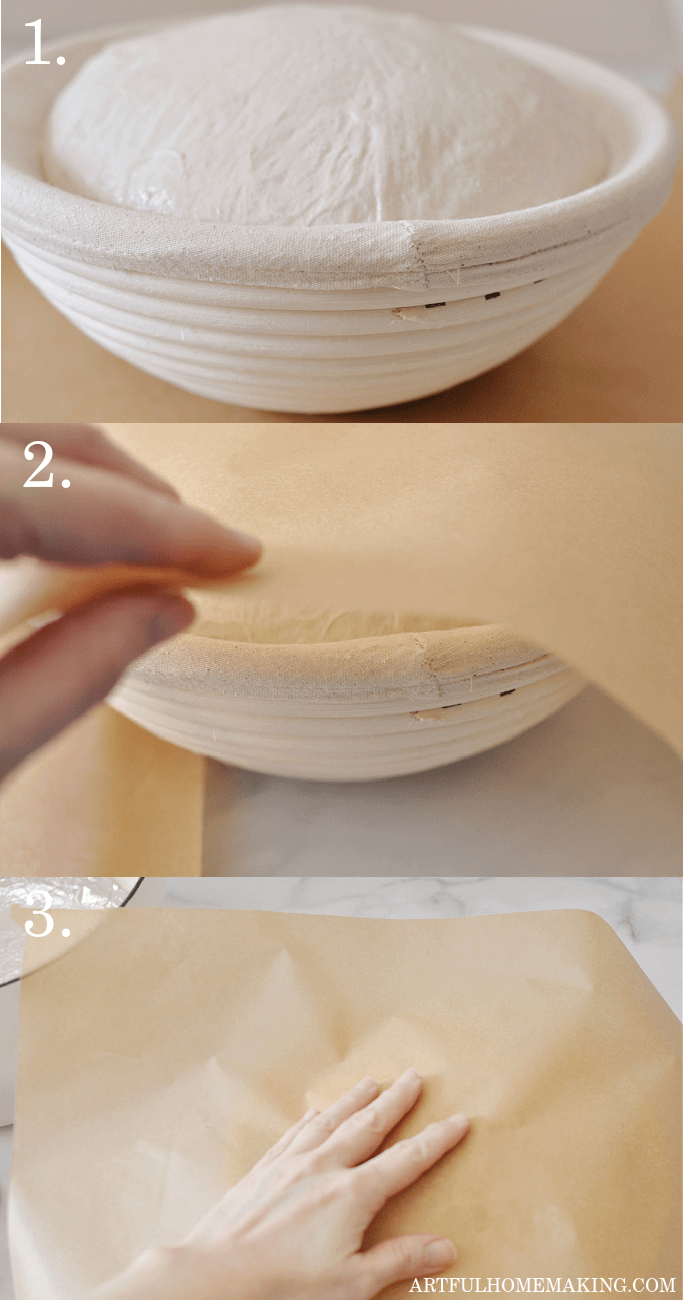
Once the oven has reached 450 degrees, take the piece of parchment paper you cut earlier and put it on top of the dough in the banneton basket.
Put one hand on top of the dough and with the other hand pick up the basket and gently turn over the basket so the dough turns upside down onto the piece of parchment paper.

Gently set the whole thing (basket, dough, and parchment paper) down on the counter.
Slowly and gently remove the banneton basket and set it aside.
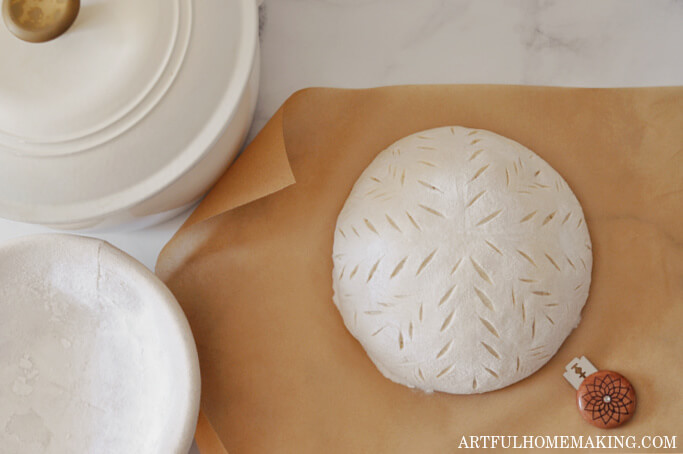
If you have clumps of flour resting on the dough, gently smooth the top of the dough with your hand.
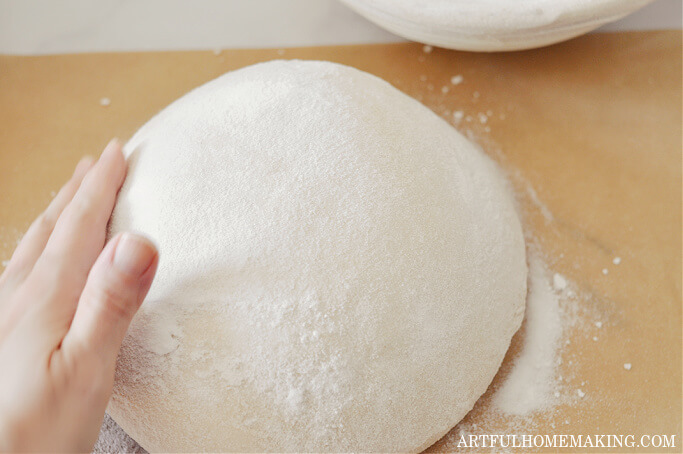
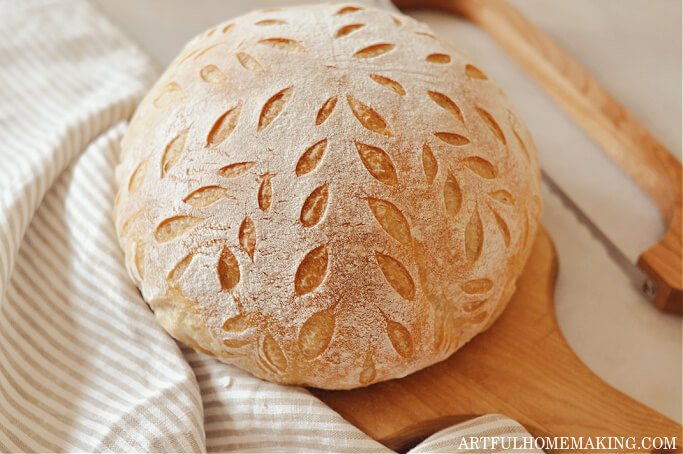
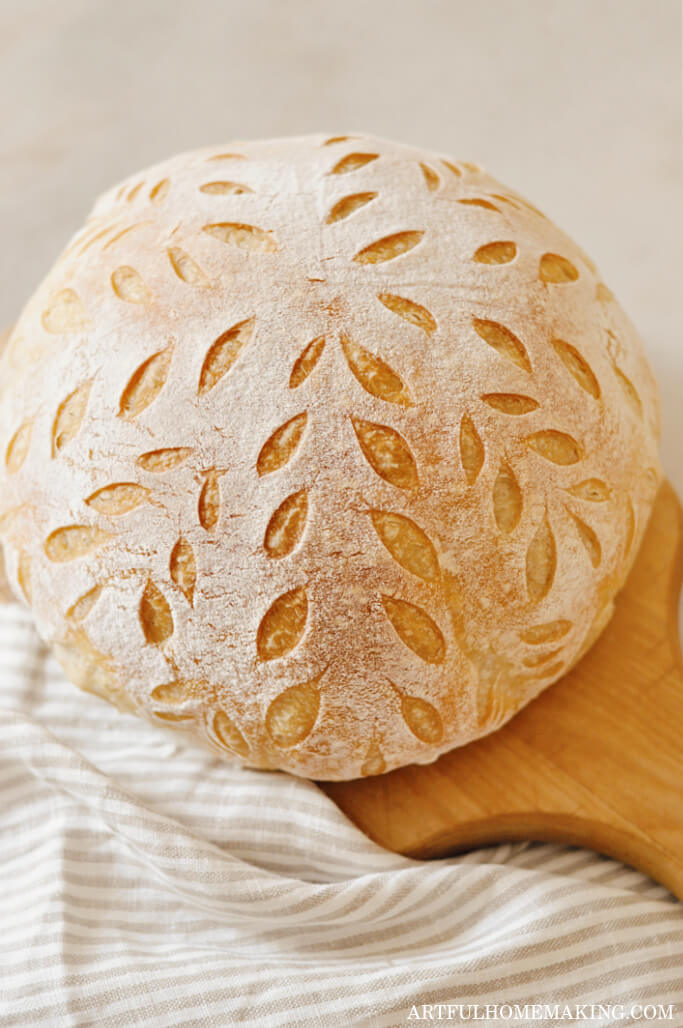
Now it’s time to score the dough. Using a bread lame or a razor blade, score the top of the dough with your chosen design. If you’re a beginner, you can simply make an “x” or a cross shape, or make some simple leaves.
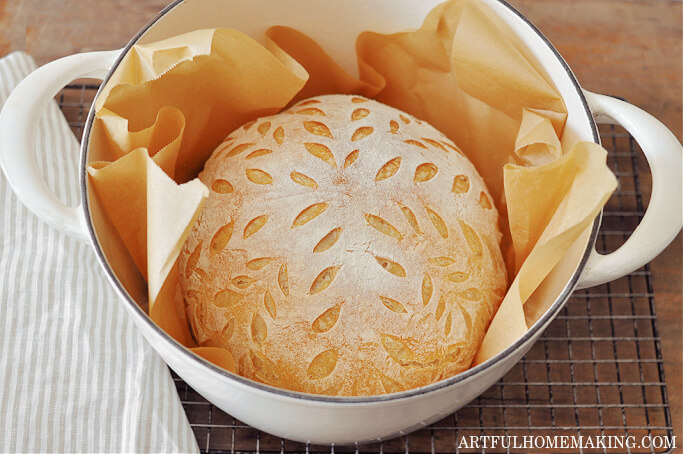
Remove the hot Dutch oven from the heated oven, using oven mitts, and remove the lid.
Grab the parchment paper by the edges and lower your sourdough bread into the heated Dutch oven and replace the lid.

Bake for 50 minutes. Do not remove the lid or open the oven during this time. When your timer goes off, check on your bread. If it isn’t brown enough yet, remove the lid and bake for another 5-10 minutes.
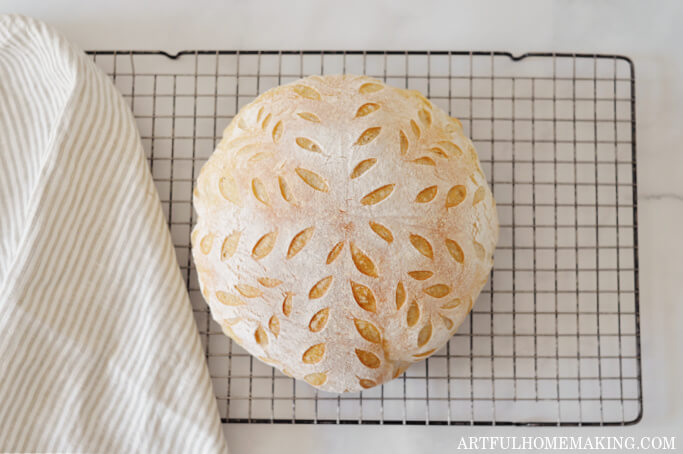
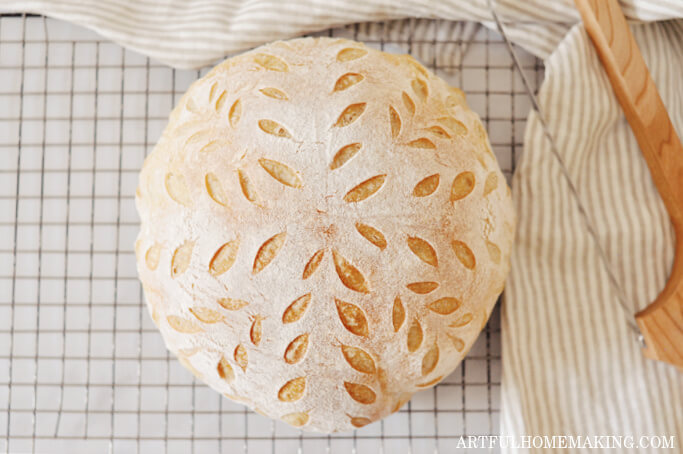
Finally, after the cooking time is up, remove the loaf from the Dutch oven and allow to cool on a wire rack. It’s best to wait at least an hour, after the loaf has fully cooled, before slicing. Enjoy your first loaf of delicious sourdough bread!
Baking Without Preheating the Oven
*Even though I’ve included instructions for using a preheated oven, I usually don’t preheat my oven before baking, and my bread has always turned out well. The bread in the photos in this post was baked without preheating.
Here are the instructions for how to bake this sourdough bread recipe without preheating the oven first.
After scoring the bread dough, lower the parchment paper with dough on it down into the Dutch oven and put on the lid.
Put the Dutch oven into the cold oven and turn oven on and set the temperature to 450 degrees F. Bake for 55 minutes with the lid on (do not lift the lid or open the oven during this time). When the timer goes off, check on your bread. It may need another 5-10 minutes in the oven with the lid off to get it perfectly browned.
Remove the finished loaf from the Dutch oven and allow to cool on a wire rack.
Sample Baker’s Schedule
One of the most complicated things when you’re a sourdough bread beginner is figuring out a workable timeline to fit in all of the steps. Here’s a sample schedule to give you an idea of how it might fit into your day.
For An Overnight Bulk Proofing Period:
5:00 PM: Mix dough and allow to rest for an hour.
6:00 PM: Stretch and fold the dough.
7:00 PM: Stretch and fold.
8:00 PM: Stretch and fold.
9:00 PM: Do final stretch and fold and leave bowl out on counter overnight.
The next day, check your dough first thing in the morning. Then put the dough in the banneton basket for the final cold proof in the refrigerator. After a few hours, score and bake your dough.
This method is only advisable if your kitchen doesn’t get too warm at night (you don’t want the room temperature to be over 70 degrees F). If it’s warm outside and you don’t have air conditioning, I wouldn’t recommend leaving your dough overnight while you’re sleeping. It could easily over-proof while you’re not watching it.
Alternate Daytime Proofing Period:
Feed sourdough starter the night before.
6:00 AM: Mix dough and allow to rest for an hour.
7:00 AM: Stretch and fold the dough.
8:00 AM: Stretch and fold.
9:00 AM: Stretch and fold.
10:00 AM: Do final stretch and fold and leave bowl out on counter for 8-10 hours.
After 8-10 hours, check your dough. It should have doubled in size and have bubbles on top of the dough and all throughout. Put the dough in the banneton basket for the final cold proof in the refrigerator. After about 3+ hours, score and bake your dough (I usually bake it the following morning).
Frequently Asked Questions
That’s all there is to making your own homemade sourdough bread! Wasn’t that easy? Here are some frequently asked questions regarding making your first loaf of sourdough bread.
How can I tell if my sourdough starter is mature?
In order to make sourdough bread successfully, you need a very active and mature sourdough starter. How can you tell when it’s ready?
Usually, your starter needs to be at least several weeks old. And during that time, new starters should be receiving very regular feedings at least once a day.
I recommend keeping a new sourdough starter out at room temperature for at least the first couple of weeks and feeding it twice daily, to build up its strength.
Once your starter starts doubling in size within a few hours of feeding, that’s a good sign that it’s strong enough to use for making bread.
Find out more about how to make and use a sourdough starter here.
When is my sourdough starter active enough to use?
Wondering how to tell if your sourdough starter has reached its “active and bubbly” stage?
Some sourdough experts recommend using the “float test” to determine if a sourdough starter is ready to use in a recipe calling for an active sourdough starter.
To do the float test, you fill a glass with water and then drop a bit of sourdough starter in it and see if it floats. If it floats, it’s active. If it sinks to the bottom, it’s not active enough to use in a recipe that needs a starter in its active state.
Instead of using the float test, I simply keep a rubber band on my sourdough starter jar. A few hours before I know I want to start my sourdough bread recipe, I feed my starter and wait for it to at least double in size. This method has worked well for me.
Why did my bread not rise?
If your loaf of sourdough bread doesn’t rise, there are a number of possibilities to consider.
Your sourdough starter may not be strong/mature enough for making bread. If this is the case, continue to keep it at room temperature for several days and feed it twice a day.
If your starter is mature and your dough didn’t rise, it may be that your dough is under-proofed. Or, it may have over-proofed (this is especially possible if you left it to proof overnight and the room temperature was warm).
How can I keep the bottom of my bread from burning?
If the bottom of your sourdough bread is getting too brown and tough, here are a few ideas to try. First, try putting a cookie sheet on a lower rack.
Try placing foil on the bottom of your Dutch oven, underneath the parchment paper.
Favorite Sourdough Bread Supply List:
More Sourdough Bread Recipes
- Easy Sourdough Sandwich Bread
- How to Make a Sourdough Starter from Scratch
- Sourdough English Muffins
- Overnight Sourdough Biscuits
- Easy Sourdough Crackers
- Sourdough Focaccia
If you make this recipe and enjoy it, please leave a comment with a 5-star recipe rating and let me know! Thank you so much!
Easy Sourdough Bread Recipe
Equipment
- Glass mixing bowl mine is 2.5 quart
- Banneton proofing basket (9" size)
- Plastic bench scraper (optional)
Ingredients
- 60 g active sourdough starter, (scant 1/2 cup)
- 340 g water, (1 1/2 cup)
- 490 g bread flour, (about 3 1/2 cups)
- 10 g salt, (1 1/2 tsp)
Instructions
- First, you'll want to make sure that your sourdough starter is very active. I keep my sourdough starter in the fridge usually, so when I want to make a loaf of bread, I remove it from the fridge and let it sit at room temperature for awhile. And then I feed it.If it's been awhile since I last used my starter, I'll sometimes feed it a few times before mixing up my sourdough bread recipe. You want it to be in its active, bubbly state before adding it to the other ingredients.
- In a large bowl, weigh out your sourdough starter. Use the tare function on your scale so that you're not including the weight of the bowl.
- Add the water to the sourdough starter in the bowl, and mix them together gently using a dough whisk, fork, or spoon.
- Add the bread flour and salt to the sourdough starter/water mixture.
- Whisk all the ingredients together in the mixing bowl gently. Then use your hands to gently mix all the ingredients together. Scrape any dough off the sides of the bowl if necessary. Cover the bowl with a piece of plastic wrap, a bowl cover, or a damp tea towel, and let the dough rest for an hour.
- After an hour, it's time to start a series of stretches and folds. Dip your fingers in a bowl of clean water and grab a section of dough between your thumb and forefingers and pull gently upwards. Stretch and fold it over to the opposite side of the bowl. Then turn the bowl slightly and pick up another section of dough and repeat the stretching and folding technique. Continue stretching and folding all around the bowl until the dough forms a ball.
- Cover the bowl with the plastic wrap or other covering and allow it to sit for about another hour. (If you're short on time, you can do a series of stretches and folds every 30 minutes or so. Usually, I do about an hour in between sets.)
- Repeat the stretching and folding 3 more times for a total of 4 times, covering and allowing to rest after each stretch-and-fold session. After the fourth and last set of stretches and folds, cover the dough with the plastic wrap or other covering.
- Allow the covered dough to sit at room temperature, undisturbed, for 8-10 hours.* This is what is called bulk fermentation. After this time is up, your dough should have doubled in size, and there will probably be visible bubbles on the top and throughout the dough. *This timing will work well if your kitchen is around 65 to 68 degrees F. If your kitchen temperature is higher, you will want to watch your dough closely, as it won't take as long. In very warm months, or in the winter with central heat, it may only take a few hours.
- Prepare your banneton basket by dusting it with flour (I use rice flour, but you can also use all-purpose) to keep the dough from sticking. Set the banneton aside for the moment.
- Reach into the bowl of risen dough, and gently peel away one edge with your fingers. Grab this loosened section of dough between your thumb and forefingers as you did before for the stretches and folds. Do the same stretching and folding technique except you don't need to lift the dough up very high this time. You're only trying to gather the dough into a ball. So grab one section and stretch it gently up and over to the other side of the bowl, then turn the bowl and repeat with another section of dough until you have formed a smooth ball of dough. Be very gentle and don’t try to pop all of the bubbles that have formed.
- Place your hand over the dough in the bowl, and gently transfer the dough from the bowl into your hand. Then gently put the dough ball, rounded side down, seam side up, into the banneton. Be very gentle with this step so you don’t deflate your dough.
- Sprinkle a bit of rice flour on the top of the dough and around the sides of the dough, if necessary, to keep it from sticking to the banneton and the plastic wrap or other covering you put over it.
- Cover the banneton basket with plastic wrap (I use the same piece that was used for the bulk fermentation period) or other covering. I use a piece of plastic wrap with a large rubber band to hold it on, but a plastic shower cap would also work well.
- Put the banneton basket with the dough in the fridge for 3-4 hours or more. Sometimes I leave it for just a few hours (a minimum of 3), but I’ve also left it overnight and it has worked out well. This is the final proofing.
- After the final proofing in the refrigerator, prepare your cast iron Dutch oven or other covered baking pan. Cut a piece of parchment paper large enough to fit inside your Dutch oven with extra on the sides so you can easily get your bread into and out of the hot pan. Set the parchment paper aside for now. Preheat the oven to 450 degrees F with the Dutch oven inside the oven so that they preheat together.*
- When the oven is about the right temperature, remove the dough from the fridge and take off the covering of plastic wrap or whatever you used to cover it.
- Once the oven has reached 450 degrees, take the piece of parchment paper you cut earlier and put it on top of the dough in the banneton basket.
- Put one hand on top of the dough and with the other hand pick up the basket and gently turn over the basket so the dough turns upside down onto the piece of parchment paper.
- Gently set the whole thing (basket, dough, and parchment paper) down on the counter. Slowly and gently remove the banneton basket and set it aside. If you have clumps of flour resting on the dough, gently smooth the top of the dough with your hand.
- Now it’s time to score the dough. Using a bread lame or a razor blade, score the top of the dough with your chosen design. If you’re a beginner, you can simply make an “x” or a cross shape, or make some simple leaves.
- Remove the hot Dutch oven from the heated oven, using oven mitts, and remove the lid. Grab the parchment paper by the edges and lower your sourdough bread into the heated Dutch oven and replace the lid.
- Bake for 50 minutes. Do not remove the lid or open the oven during this time. When your timer goes off, check on your bread. If it isn’t brown enough yet, remove the lid and bake for another 5-10 minutes.
- Finally, after the cooking time is up, remove the loaf from the Dutch oven and allow to cool on a wire rack. It’s best to wait at least an hour, after the loaf has fully cooled, before slicing. Enjoy!
Notes
Nutrition
Nutrition information is automatically calculated, so should only be used as an approximation.


Love this sourdough recipe! My family devours it.
I’d love to try some inclusions. Any suggestions of what to use and how much?
Also, I’m wondering if the bread should reach a certain internal temperature when ready. Somewhere between 200 – 210?
Thank you so much for the positive review, Carol-Ann! I’m so glad you love the recipe! There are so many options for inclusions. Some suggestions would be nuts, dried fruit, and shredded cheese. I usually aim for about 1 cup of inclusions. You can add these during the stretch and fold step. It usually works best to add them during the second or third stretch and fold, sprinkling them on top of the dough and then gently stretching and folding the dough until the inclusions are fully mixed in. Follow all the other instructions as usual, but before baking I would make sure none of the inclusions are sticking out of the dough, or they may tend to burn when baking. Some inclusions, like cinnamon, can slow down the bulk fermentation time. Also, loaves with inclusions often don’t rise as high. 200-205 degrees F is the internal temperature I look for.
Best sourdough bread recipe EVER! Always comes out perfect!. Can I put add ins like pecans or raisins in there and if so how?
Thank you so much, Lisa! I’m so glad you love the recipe! Yes, you can add inclusions to this loaf. You can add these during the stretch and fold step. It usually works best to add them during the second or third stretch and fold, sprinkling them on top of the dough and then gently stretching and folding the dough until the add ins are fully mixed in. I would aim for about 1 cup or so of nuts or raisins. Follow all the other instructions as usual, but before baking I would make sure none of the inclusions are sticking out of the dough, or they may tend to burn when baking.
Thank you so much!!! One last question, can I add cinnamon too. I was thinking cinnamon pecan raisin. So I need to add a little bit of sugar to the cinnamon? Soak the raisins?
You’re very welcome! Yes, you could add cinnamon, and you could make a cinnamon sugar mixture. It is a good idea to soak the raisins, because they can pull some of the moisture from the dough if not soaked first. Cinnamon can slow the fermentation process, so the bulk fermentation timing may be different with cinnamon added. Also, a loaf with inclusions may not rise as high.