This post may contain affiliate links. Please read our disclosure policy.
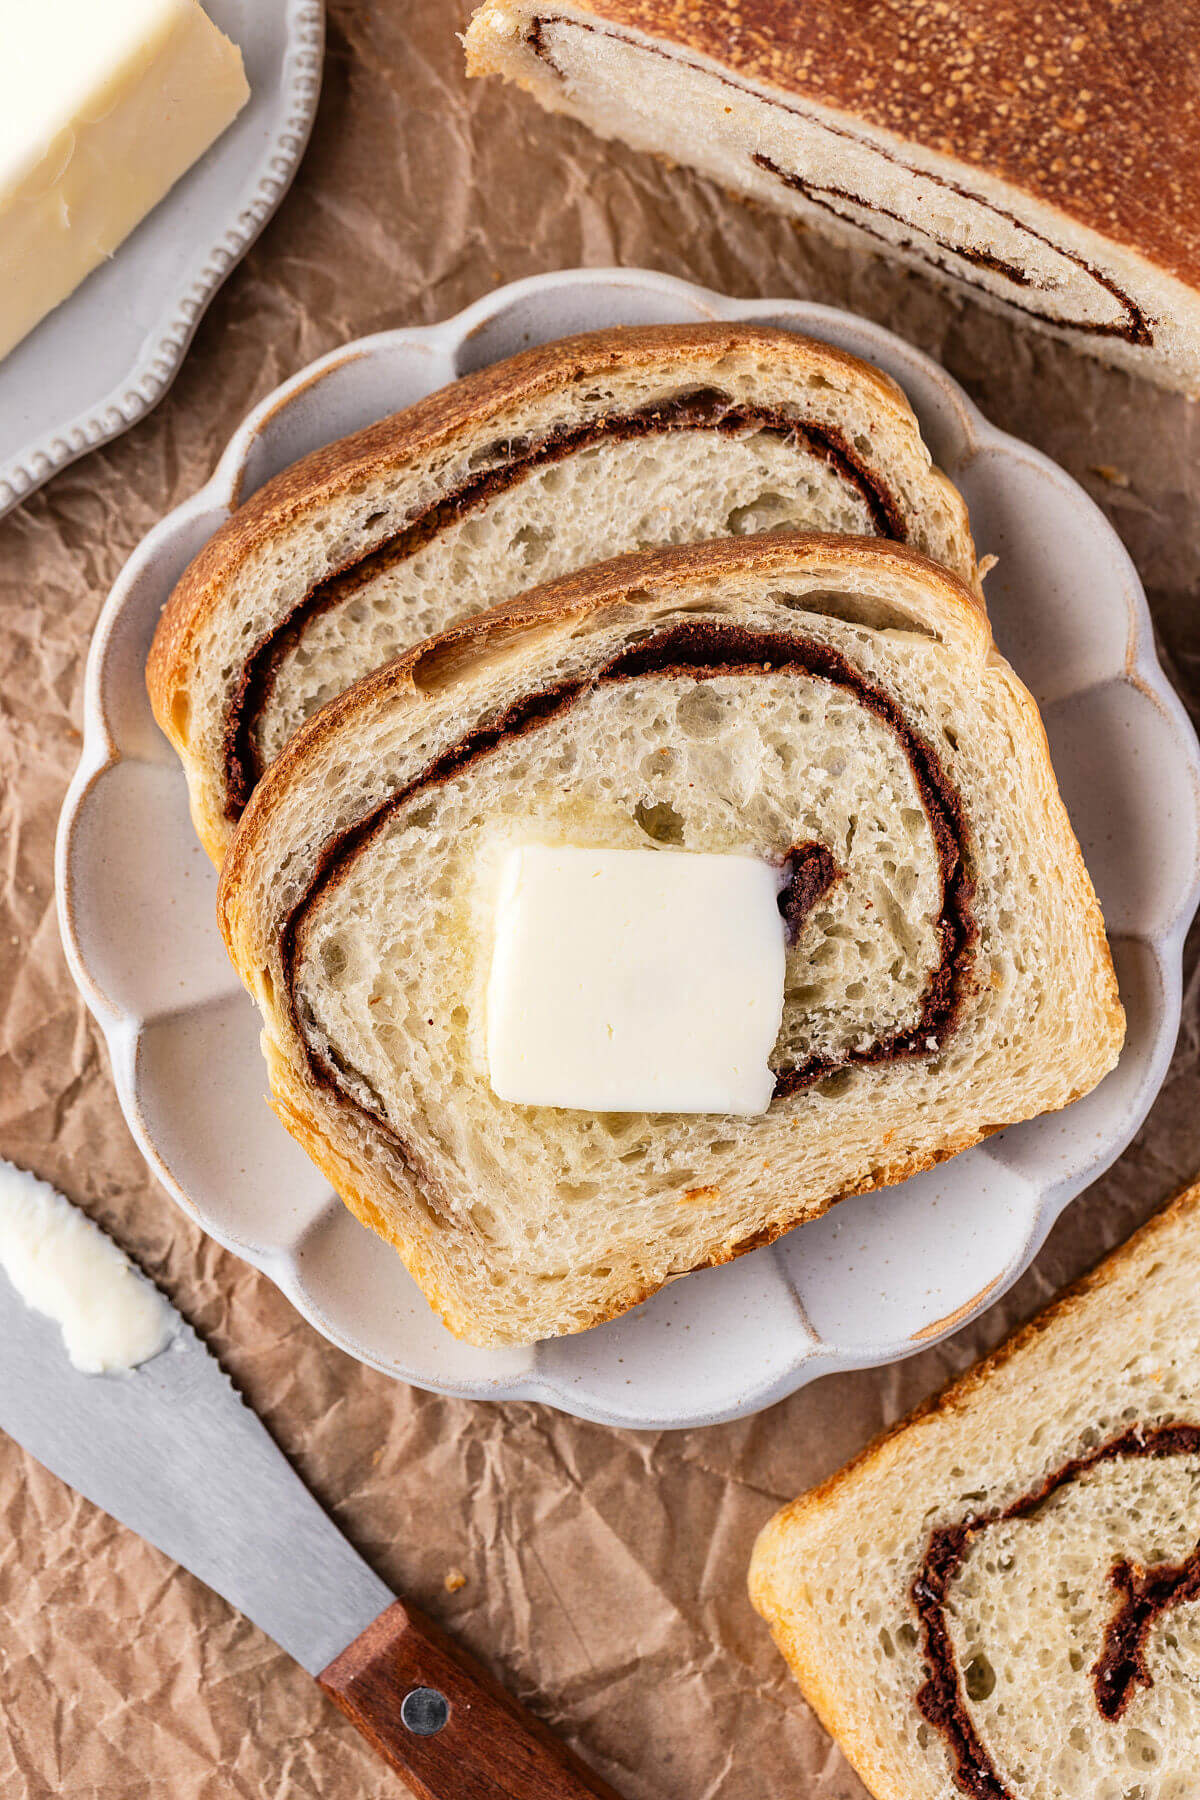
This sourdough cinnamon swirl bread gives you all the cozy flavor of a classic cinnamon bread, but made with an active sourdough starter.
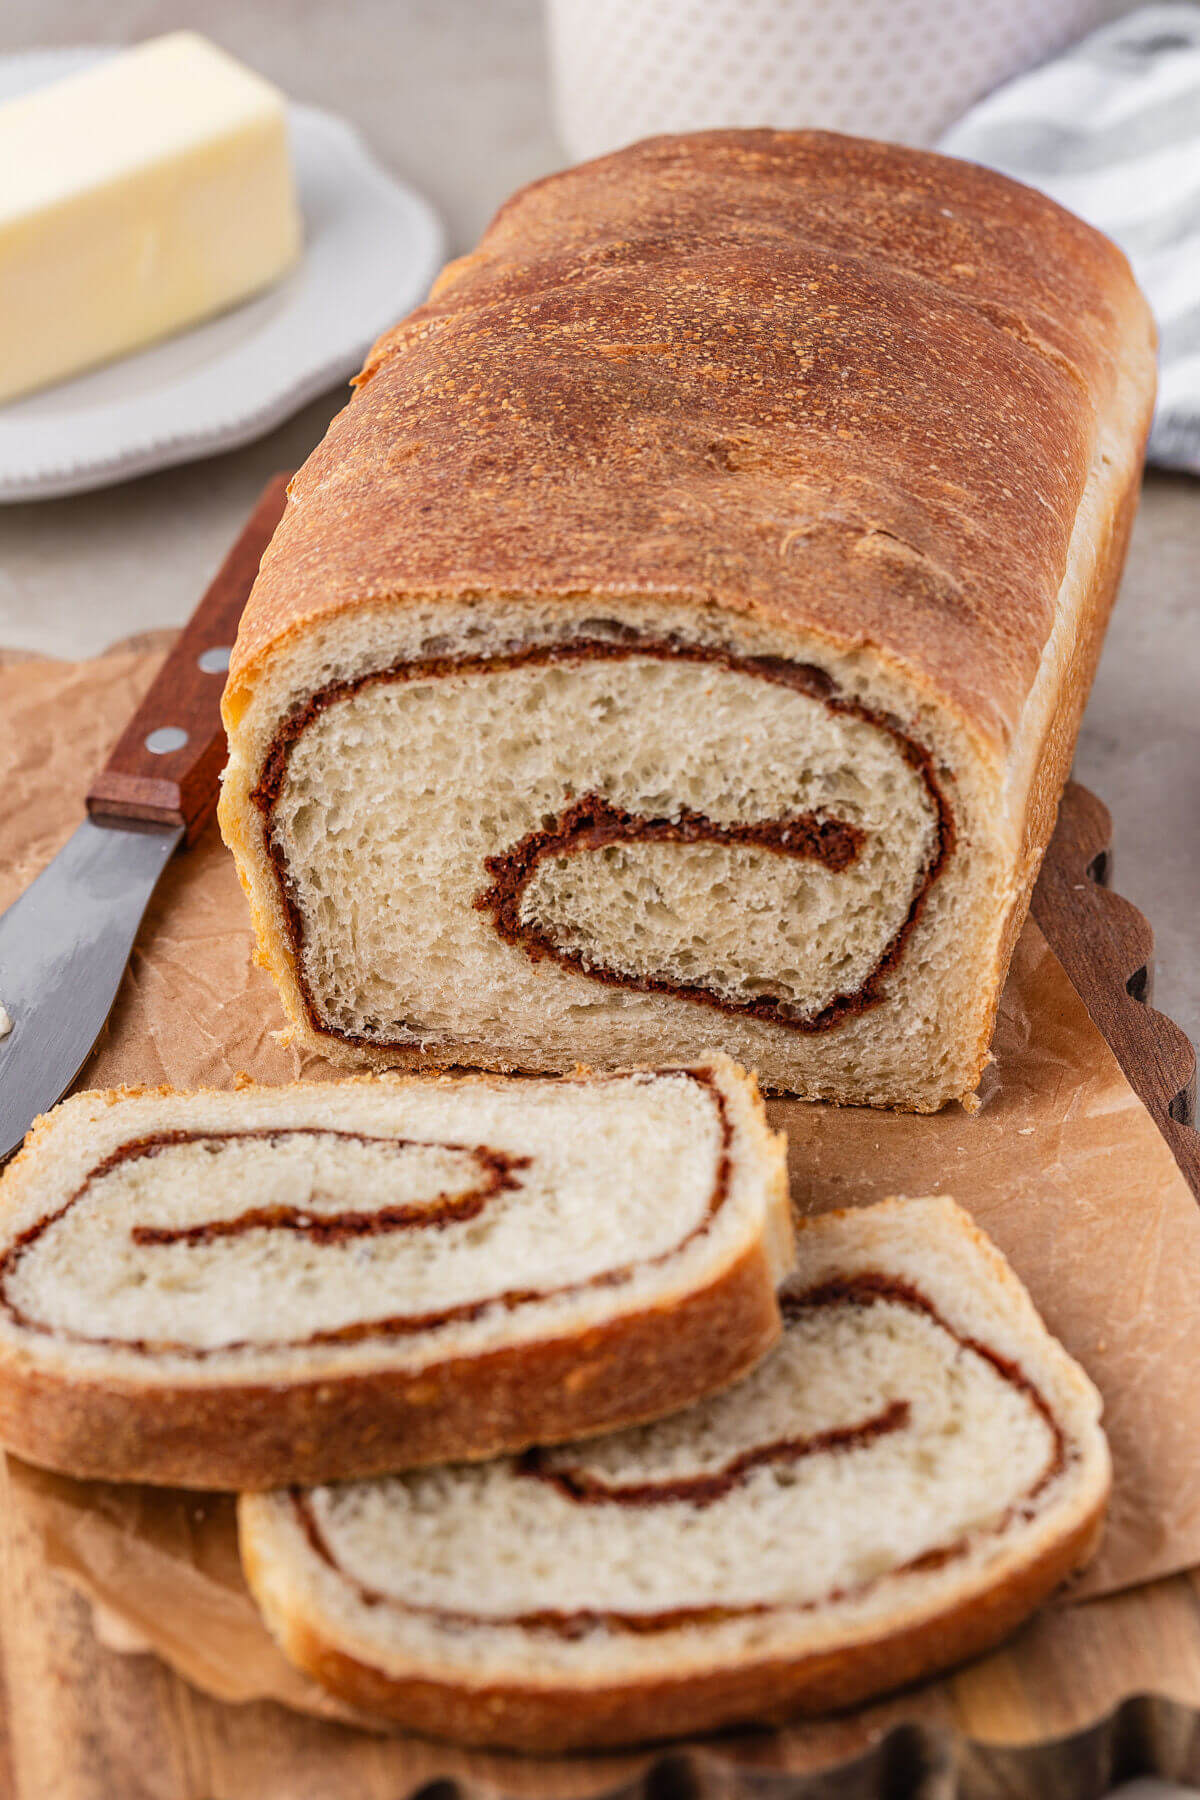
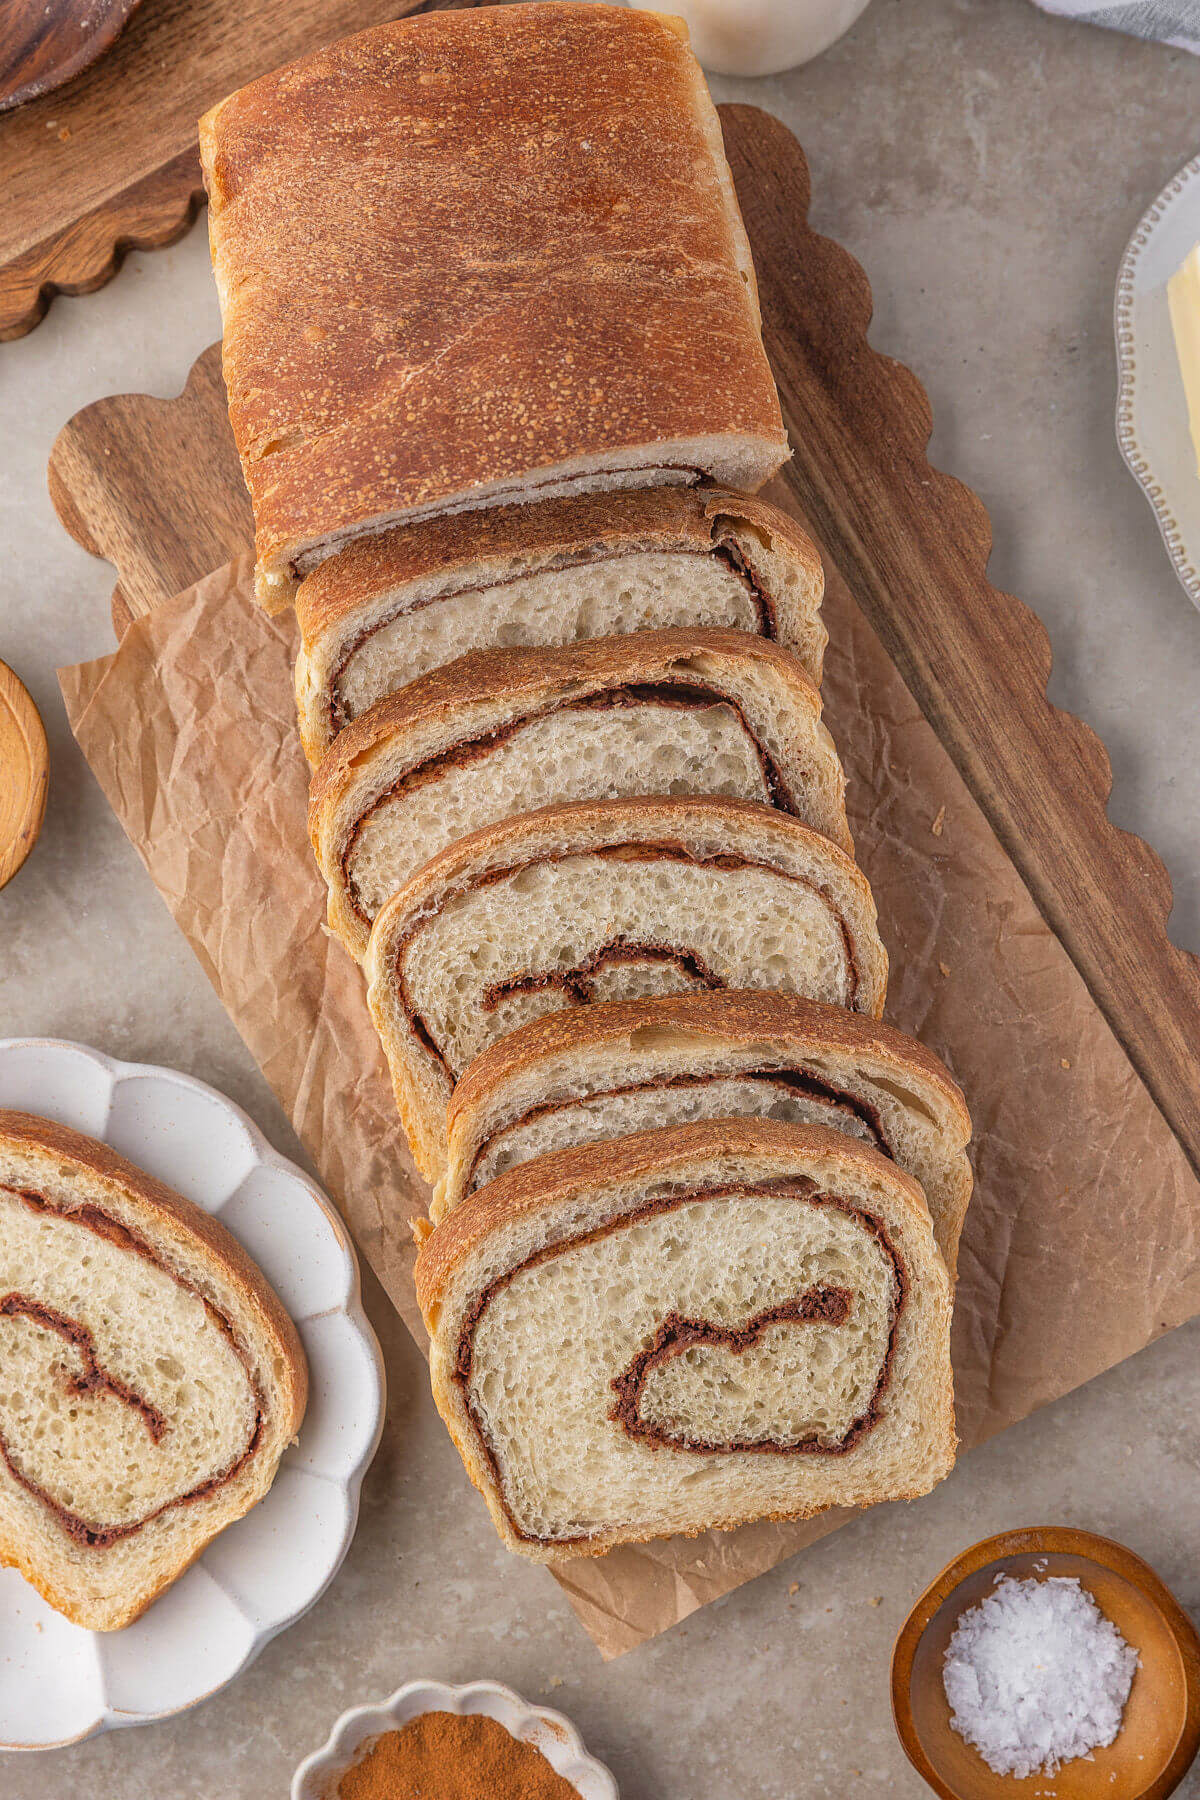
There is something so satisfying about slicing into a sourdough cinnamon swirl loaf and seeing that ribbon of brown sugar woven through every piece.
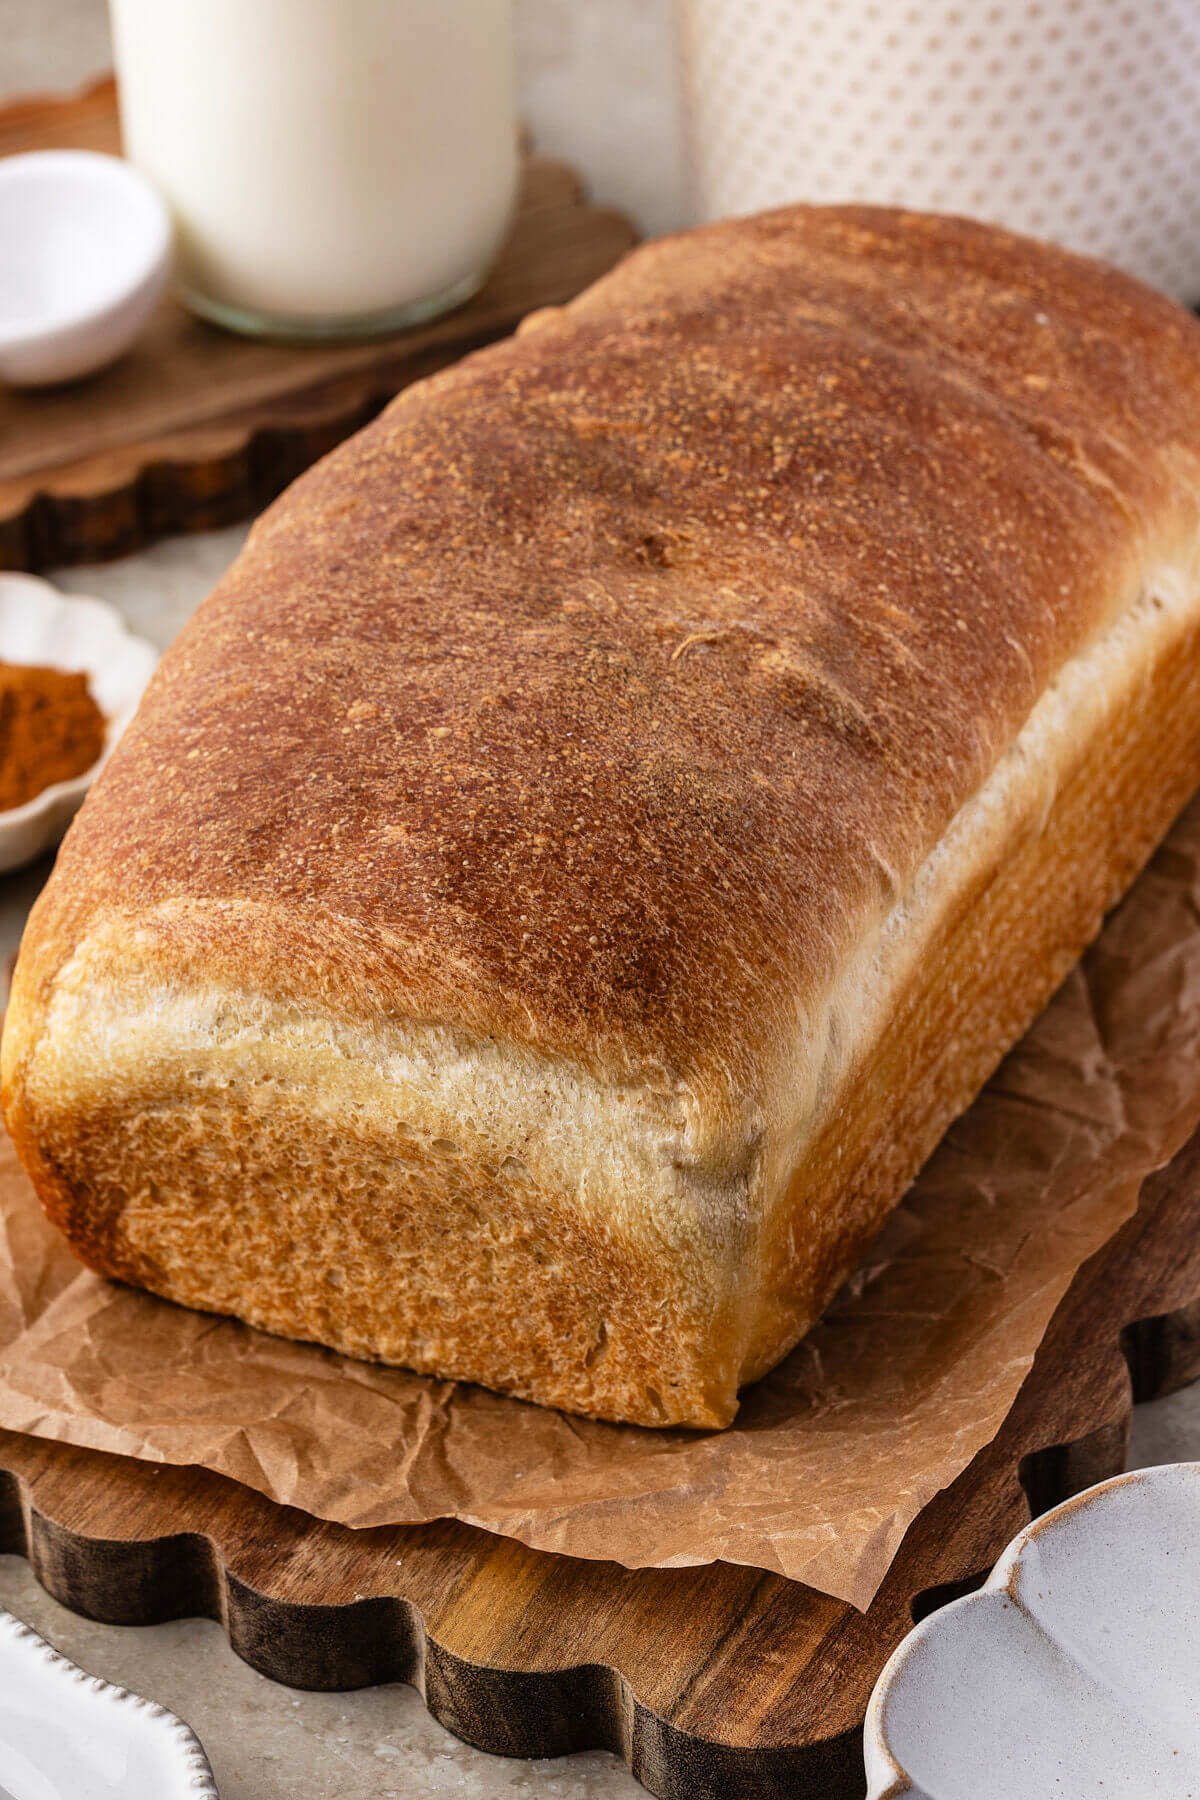
Baked in a 9×5 loaf pan for reliable structure, this bread is soft enough for fresh slices with butter and sturdy enough for toasting the next morning. The swirl stays defined, the crumb stays tender, and it is absolutely delicious.
For more sourdough cinnamon recipes, try these sourdough discard cinnamon rolls, sourdough discard cinnamon roll focaccia, and sourdough apple cinnamon scones.
Why You’ll Love This Recipe
- Uses active starter instead of commercial yeast. Learn how to make your own sourdough starter here.
- Makes a delicious breakfast bread, perfect for turning into sourdough french toast.
- Great for gifting: A loaf of cinnamon swirl sourdough bread is such a welcome gift for fellow bread lovers!
For more sourdough breakfast ideas, try this sourdough english muffin bread, sourdough pop tarts, and sourdough hot cross buns with raisins.
Ingredients
Find the full list of ingredients, amounts, and instructions in the recipe card at the bottom of this post.
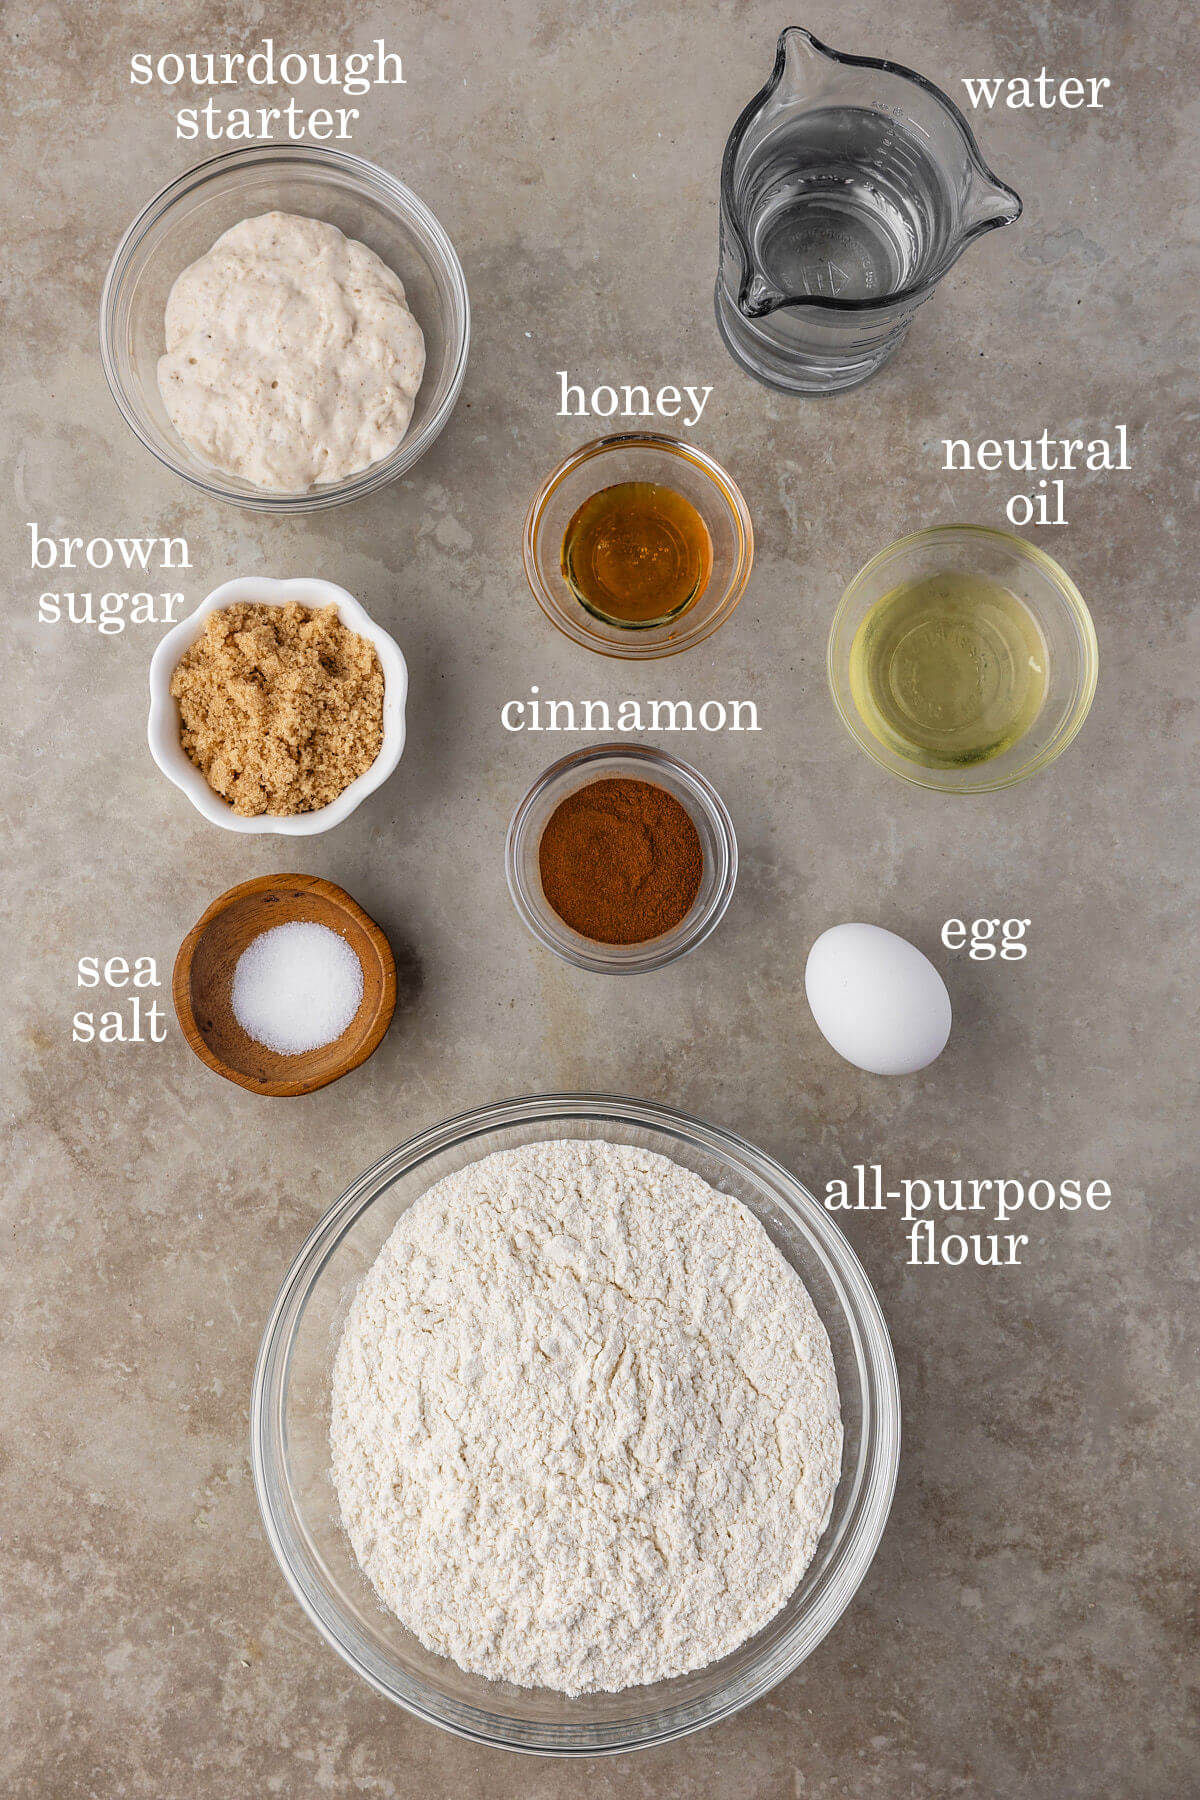
- All-Purpose Flour: This sourdough cinnamon swirl bread uses all-purpose flour.
- Active Sourdough Starter: Makes the bread rise
- Honey: The sweetener used
- Cinnamon-Sugar Mixture: Adds a swirl of sweetness with a hint of cinnamon to the center of the bread
- Neutral Oil: You can use avocado oil, coconut oil, or another vegetable oil.
How to Make Sourdough Cinnamon Swirl Bread
Step One: Mixing the Dough
Stand Mixer Method (Recommended for Strong Gluten Development)
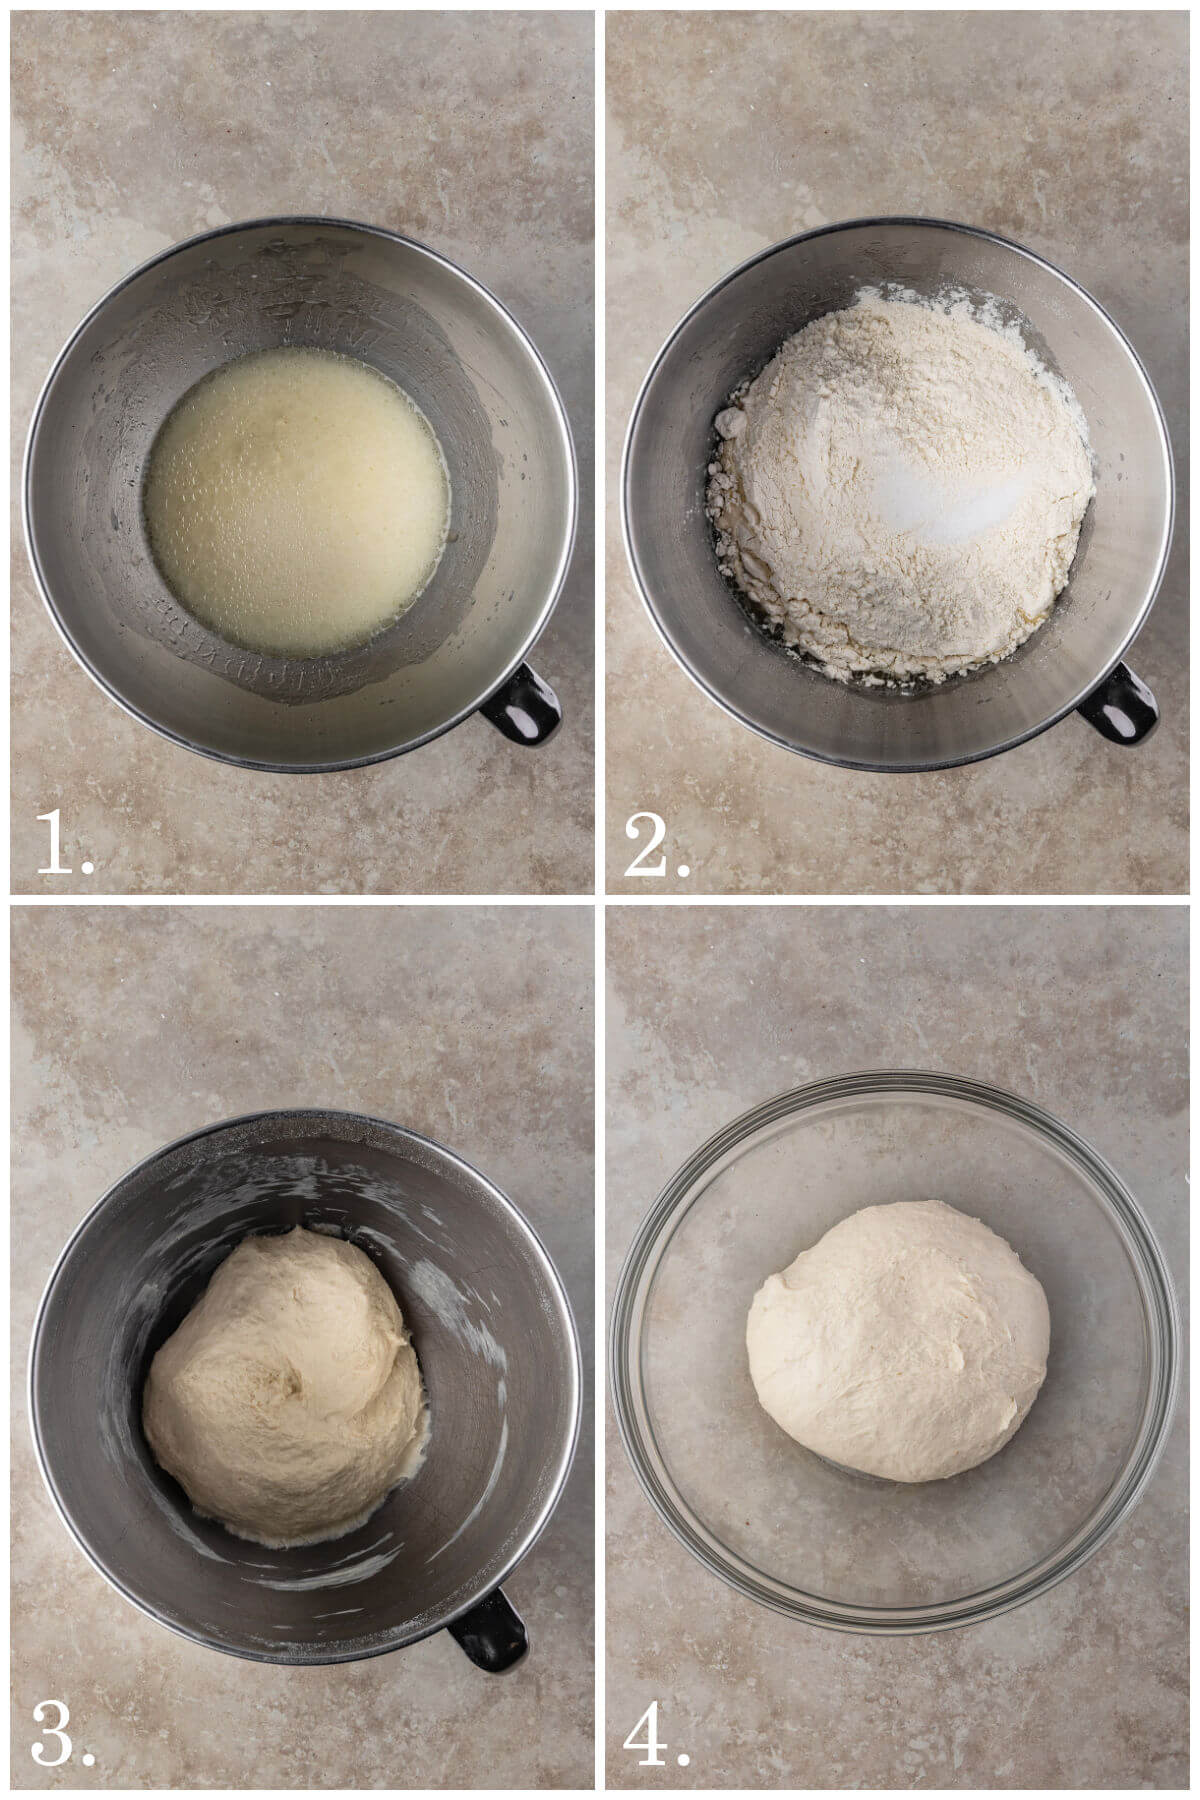
In the bowl of a stand mixer, whisk together the water, starter, honey, and oil (Photo 1). Add the flour and salt and mix until no dry flour remains (Photo 2).
Fit with a dough hook and mix on low speed for 3–4 minutes until the dough becomes smooth and elastic. The dough should pull slightly from the sides but still feel soft and slightly tacky (Photo 3).
Transfer to a lightly greased bowl (Photo 4) and cover. Rest 20–30 minutes.
Perform 1–2 sets of stretch and folds spaced 20–30 minutes apart. Because the mixer has already developed gluten, fewer folds are needed.
Proceed to bulk fermentation.
Optional Bowl Method (No Mixer)
If you don’t have a stand mixer, or you’d just rather make this loaf by hand, follow these instructions.
In a large mixing bowl, whisk together the water, starter, honey, and oil. Add the flour and salt and mix thoroughly until no dry flour or shaggy bits remain.
Once combined, knead the dough either directly in the bowl or on a lightly damp counter. Work the dough for about 4–6 minutes, until it becomes smoother and more elastic. If the dough feels sticky, lightly wet your hands instead of adding additional flour.
The dough should feel cohesive and slightly tacky, not dry.
Cover and let rest 20–30 minutes.
After resting, perform 4 sets of stretch and folds spaced 20–30 minutes apart to continue building strength. Each set should make the dough feel smoother and more structured.
Proceed with bulk fermentation.
Step Two: Bulk Fermentation
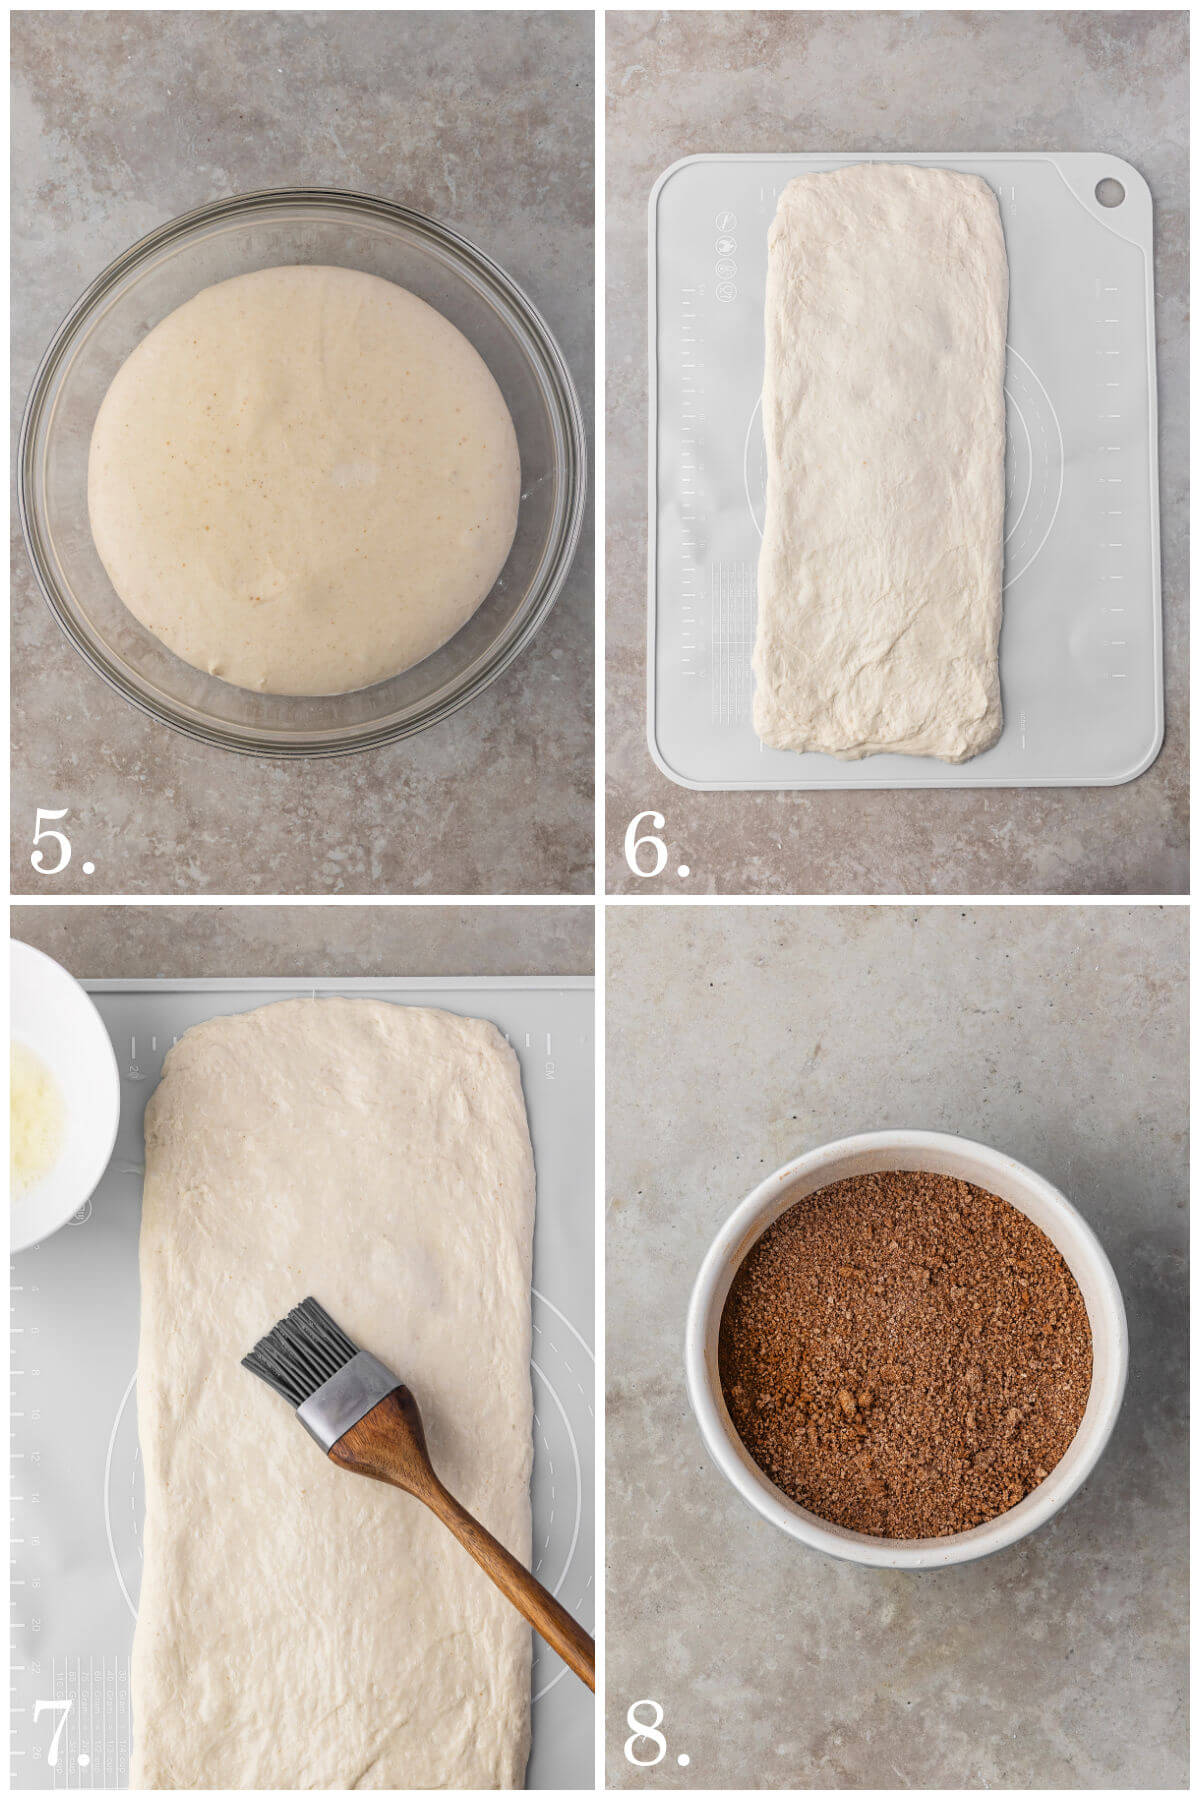
Let the dough rise at 68–72°F until it increases about 50–60% in volume and looks puffy with small bubbles along the sides (Photo 5). The dough should feel lighter and elastic when gently lifted.
Step Three: Shaping
Lightly grease a 9×5 loaf pan. Turn the dough onto a lightly floured surface and rest 10 minutes.
Roll into a rectangle approximately 8 inches wide (the width of your loaf pan) and 16–18 inches long (Photo 6). If you have the counter space, rolling slightly longer (up to 20 inches) will create a more defined swirl — just be sure the width remains consistent with the pan to avoid uneven shaping.
Brush evenly with egg white (Photo 7). Mix brown sugar, cinnamon, and flour (Photo 8).
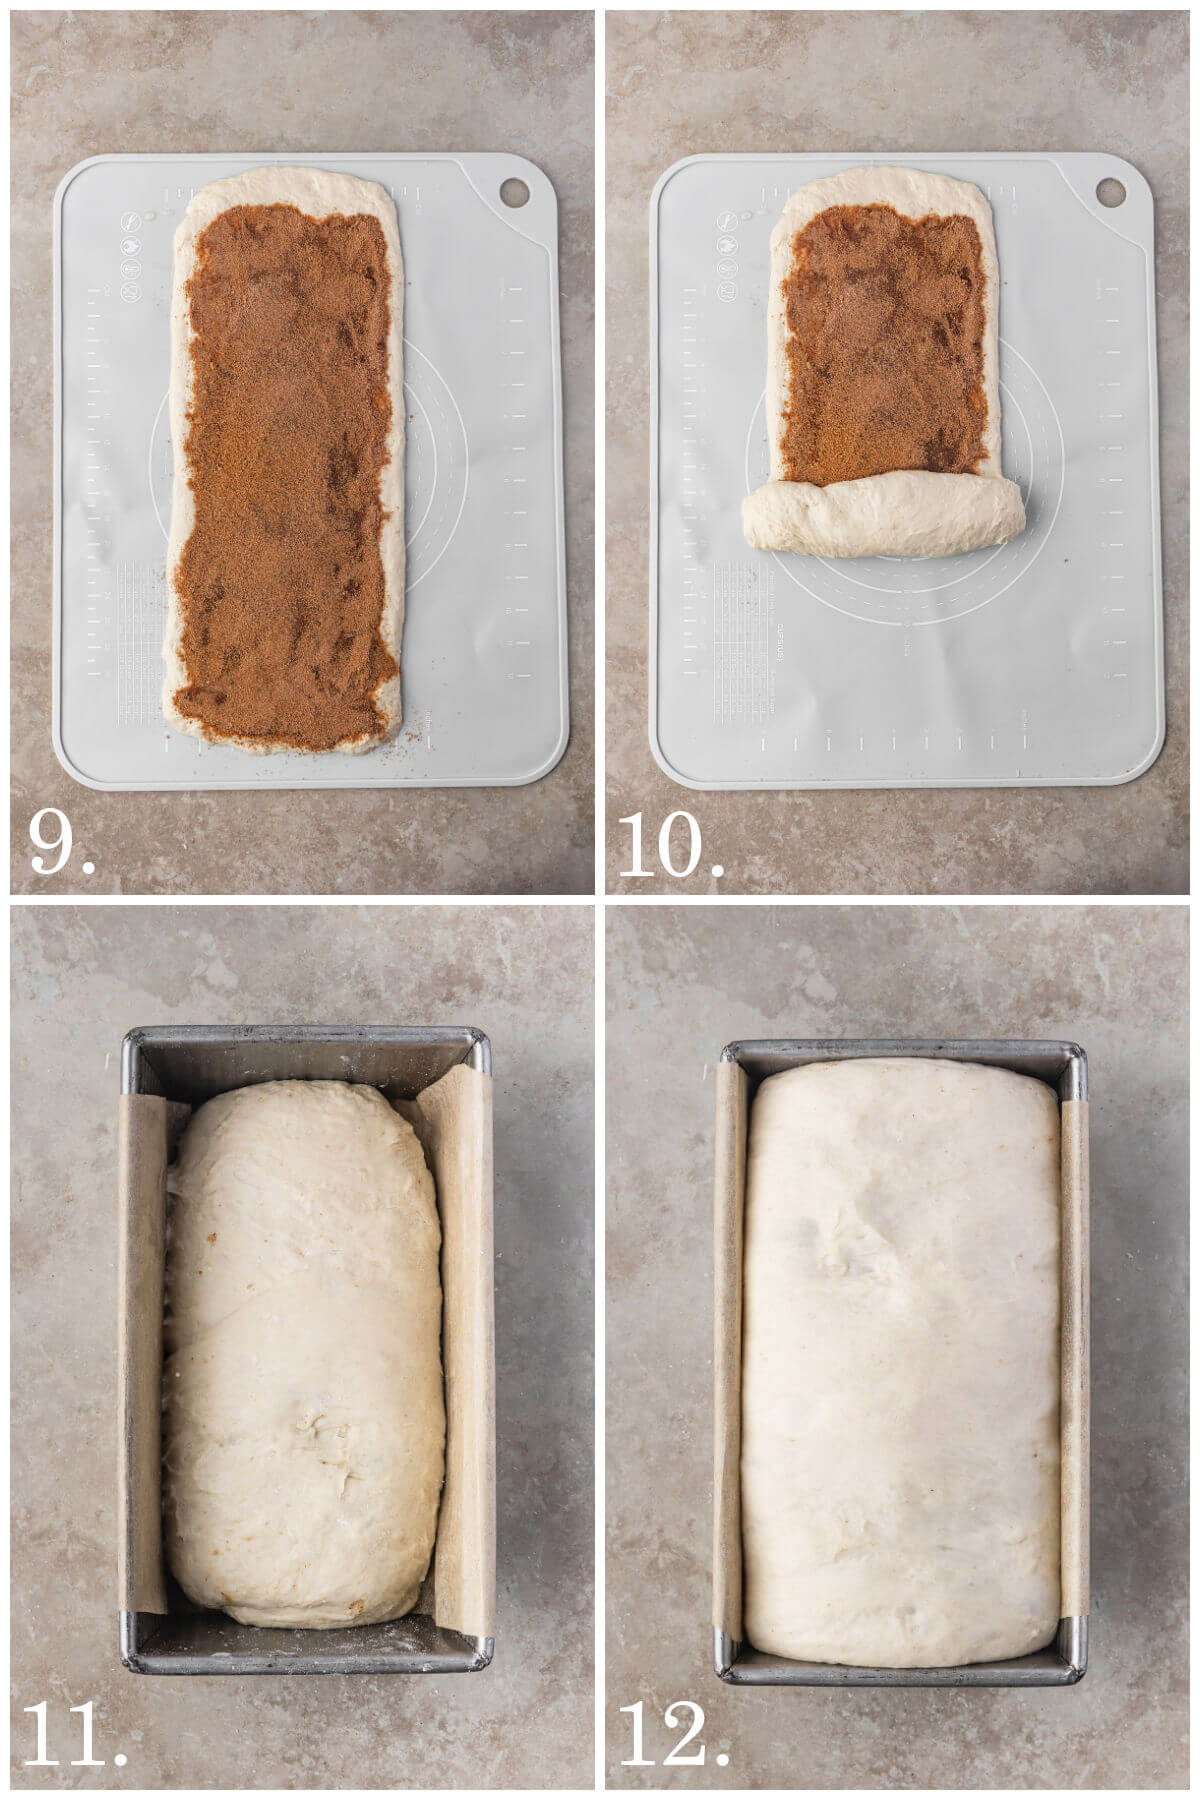
Sprinkle cinnamon sugar mixture evenly, leaving a ½-inch border along one long edge (Photo 9). Starting from the long edge opposite the clean border, roll tightly into a log. As you roll, gently tuck and pinch the edges inward to prevent cinnamon leakage at the ends (Photo 10).
Pinch the final seam firmly closed and place seam-side down in the pan (Photo 11).
Step Four: Final Proof
Cover and proof at 68–72°F until the dough rises to level with or just slightly above the rim of the pan (Photo 12). This may take 3–5 hours, depending on the temperature.
How to tell when it’s ready to bake:
The dough should rise to level with or slightly above the rim of the pan. When gently pressed, it should slowly spring back and leave a soft indentation. It is better to bake slightly underproofed than overproofed.
Recipe Tip
How to Do a Poke Test
Gently press the top of the dough with a fingertip:
- If it springs back immediately = underproofed
- If it springs back slowly and leaves a slight indentation = ready
- If it collapses and stays indented = overproofed
For this loaf, it is safer to bake slightly underproofed than overproofed.
Step Five: Bake
Preheat oven to 375°F. Bake 40–45 minutes. Tent loosely with foil during the last 10 minutes if browning too quickly. Internal temperature should reach 200–202°F.
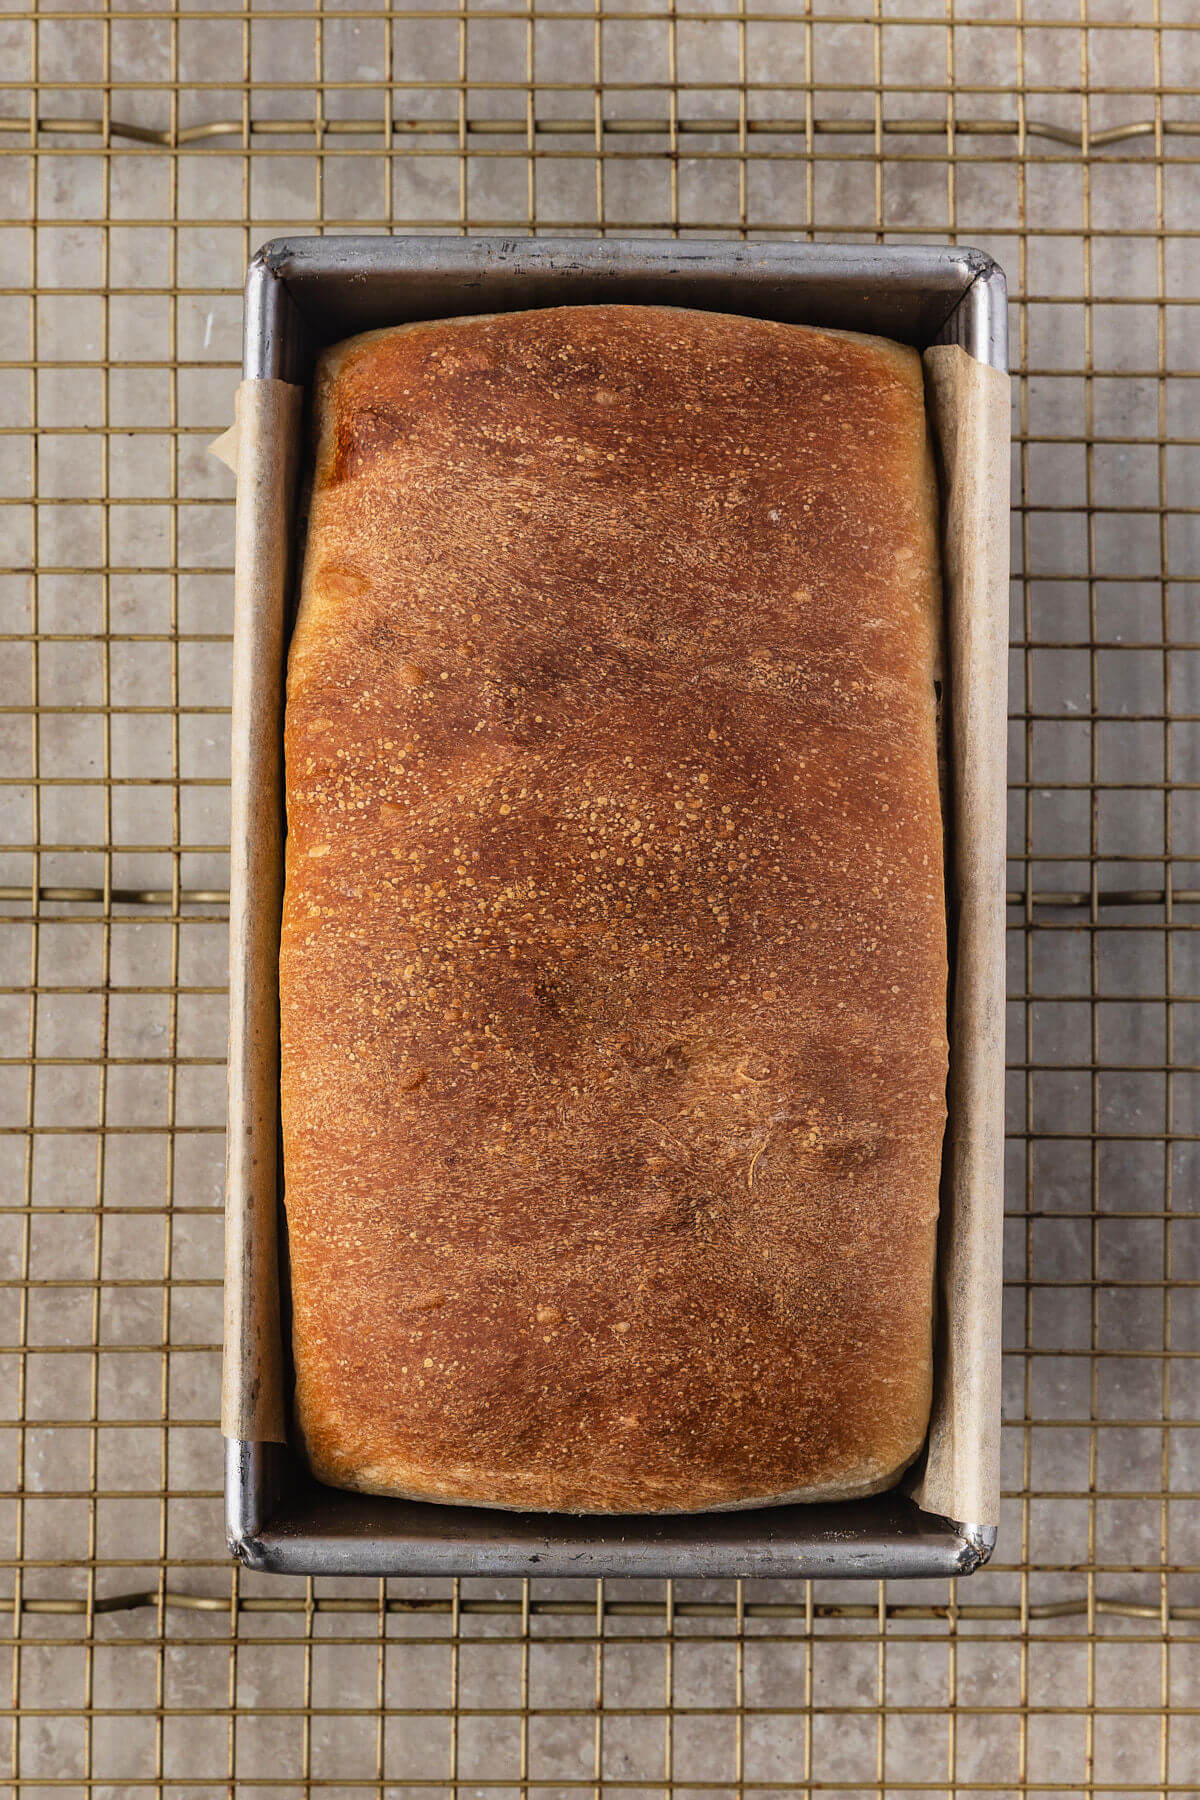
Cool in pan 10–15 minutes, then remove to a wire rack and cool completely before slicing.
How to Store
Store wrapped at room temperature for up to 2 days or refrigerate up to 5 days.
Freezing
This loaf freezes beautifully. Allow to cool completely, then slice and freeze with parchment between slices. Store in an airtight bag up to 2 months.
Reheating
From Room Temperature: Warm slices in the microwave 10–15 seconds or toast lightly.
From Frozen: Toast directly from frozen on medium setting. For a softer texture, microwave 20–30 seconds from frozen.
Timing Guide: How to Plan Your Bake
This recipe works beautifully as a same-day bake when you feed your starter the night before. For the most predictable results, aim for a room temperature between 68–72°F.
The night before (around 9–10 PM), feed your starter at a 1:2:2 or 1:3:3 ratio so it peaks the following morning. In the morning (around 8–9 AM), mix your dough while the starter is active, bubbly, and near its highest point.
Complete your stretch and folds within the first 1–2 hours after mixing. Allow the dough to bulk ferment until it has risen about 50–60% and feels lighter and elastic. In an average 70°F kitchen, this usually takes 4–6 hours from mixing.
Shape the dough in the late afternoon and place it in the loaf pan. The final proof typically takes 3–5 hours, depending on temperature. Bake once the dough has risen level with or just slightly above the rim of the pan and passes the gentle poke test.
If your kitchen runs cooler (below 68°F), expect both bulk and final proof to take longer. Warmer kitchens (above 73°F) will speed things up. Always let the dough’s appearance and feel guide you rather than relying strictly on the clock.
Tips
- This recipe uses an egg white to help the cinnamon sugar adhere to the dough and reduce swirl separation. This technique is inspired by the traditional cinnamon swirl method in a recipe from the Kind Arthur Flour.
- A small amount of flour helps absorb moisture from the sugar as it bakes, reducing syrup leakage and helping the swirl stay defined rather than dissolving into the crumb.
- If avoiding egg white, you may lightly mist the dough with water before adding the cinnamon sugar. Results may be slightly less defined.
- Stand mixer mixing develops strong gluten quickly and reduces the number of stretch and folds needed. The bowl method works beautifully but requires more folds for equivalent strength.
Recipe FAQs
Yes. The dough can absolutely be mixed by hand in a bowl. Be sure to mix thoroughly until no shaggy bits remain and perform 4 full sets of stretch and folds to build strength.
The egg white helps bind the cinnamon sugar to the dough and reduces gaps in the swirl. If needed, you may lightly mist the dough with water instead, but the swirl may not be as defined.
The small amount of flour absorbs moisture from the sugar as it bakes and helps prevent syrupy leakage at the bottom of the loaf.
Yes. Bread flour will produce a slightly chewier texture and may require 5–10 grams of additional water, depending on absorption.
Scoring is unnecessary for pan loaves and can expose the cinnamon swirl, encourage leaking, and cause uneven splitting. The loaf is supported by the pan and will rise naturally in the oven.
Yes. After shaping and placing in the pan, cover tightly and refrigerate overnight. Allow to sit at room temperature until it reaches the rim of the pan, then bake.
If your kitchen is below 68°F, fermentation will move slowly. You may: Allow extra time for bulk and final proof, move the dough to a slightly warmer area of the house, avoid continuous high heat during final proof to prevent cinnamon melt.
Swirl separation is usually caused by one of the following:
Not rolling tightly enough
Skipping the egg white (or moisture layer)
Overproofing in the pan
Not pinching the seam and edges closed firmly
Be sure to roll tightly, pinch the edges inward slightly, and bake once the dough is level with or just slightly above the rim of the pan.

More Sourdough Recipes
- Easy Sourdough Sandwich Bread
- Sourdough English Muffin Bread
- Sourdough Lemon Blueberry Bread
- Blueberry Cream Cheese Sourdough Bread
- Easy Sourdough Bread Recipe for Beginners
If you make this sourdough cinnamon swirl bread recipe and enjoy it, please leave a comment with a 5-star recipe rating and let me know! Thank you so much!

Sourdough Cinnamon Swirl Bread
Equipment
- Stand Mixer (optional but helpful for faster gluten development)
Ingredients
Dough
- 230 grams water
- 80 grams active sourdough starter, 100% hydration, recently fed
- 20 grams honey, 1 tablespoon
- 20 grams neutral oil, such as avocado oil
- 400 grams all-purpose flour
- 8 grams fine sea salt, about 1 1/3 teaspoons
Cinnamon Swirl
- 1 large egg white
- 65 grams brown sugar, (1/3 cup) packed
- 1 1/2 tablespoons ground cinnamon
- 1 teaspoon all-purpose flour
Instructions
- Mixing the Dough: Stand Mixer Method (Recommended for Strong Gluten Development) See notes for bowl method if you prefer not to use a mixer.In the bowl of a stand mixer, whisk together the water, starter, honey, and oil. Add the flour and salt and mix until no dry flour remains.
- Fit with a dough hook and mix on low speed for 3–4 minutes until the dough becomes smooth and elastic. The dough should pull slightly from the sides but still feel soft and slightly tacky.
- Transfer to a lightly greased bowl and cover. Rest 20–30 minutes.
- Perform 1–2 sets of stretch and folds spaced 20–30 minutes apart. Because the mixer has already developed gluten, fewer folds are needed.
- Bulk Fermentation: Let the dough rise at 68–72°F until it increases about 50–60% in volume and looks puffy with small bubbles along the sides. The dough should feel lighter and elastic when gently lifted.
- Shaping: Lightly grease a 9×5 loaf pan. Turn the dough onto a lightly floured surface and rest 10 minutes.
- Roll into a rectangle approximately 8 inches wide (the width of your loaf pan) and 16–18 inches long. If you have the counter space, rolling slightly longer (up to 20 inches) will create a more defined swirl — just be sure the width remains consistent with the pan to avoid uneven shaping. Brush evenly with egg white.
- Mix brown sugar, cinnamon, and flour and sprinkle evenly, leaving a ½-inch border along one long edge.
- Starting from the long edge opposite the clean border, roll tightly into a log. As you roll, gently tuck and pinch the edges inward to prevent cinnamon leakage at the ends. Pinch the final seam firmly closed and place seam-side down in the pan.
- Final Proof: Cover and proof at 68–72°F until the dough rises to level with or just slightly above the rim of the pan. This may take 3–5 hours, depending on the temperature.
- Poke Test: Gently press the dough with a fingertip: If it springs back immediately = underproofed. If it springs back slowly and leaves a slight indentation = ready. If it collapses and stays indented = overproofed. For this loaf, it is safer to bake slightly underproofed than overproofed.
- Bake: Preheat oven to 375°F. Bake 40–45 minutes. Tent loosely with foil during the last 10 minutes if browning too quickly. Internal temperature should reach 200–202°F.
- Cool in pan 10–15 minutes, then remove to a wire rack and cool completely before slicing.
Notes
- This recipe uses an egg white to help the cinnamon sugar adhere to the dough and reduce swirl separation. This technique is inspired by the traditional cinnamon swirl method in a recipe from the Kind Arthur Flour.
- A small amount of flour helps absorb moisture from the sugar as it bakes, reducing syrup leakage and helping the swirl stay defined rather than dissolving into the crumb.
- If avoiding egg white, you may lightly mist the dough with water before adding the cinnamon sugar. Results may be slightly less defined.
- Stand mixer mixing develops strong gluten quickly and reduces the number of stretch and folds needed. The bowl method works beautifully but requires more folds for equivalent strength.
Nutrition
Nutrition information is automatically calculated, so should only be used as an approximation.


This beautiful bread is perfect for every day and for gifting!
Hi Joy, thanks for the recipe. I made this yesterday. For the cinnamon swirl I subbed 50ml raw honey with a little bit of molasses in place of the brown sugar. Turned out beautifully.
Thank you so much for the positive review, Kelly! I’m so happy it was a success! And thank you so much for sharing the adjustments you made!