This post may contain affiliate links. Please read our disclosure policy.
My children L-O-V-E granola bars as a snack! And we can find premade ones pretty inexpensively at the local discount grocery store.
The only trouble is, the ingredients in the store version are often not that great.
Homemade granola bars use healthier ingredients and are so fun to make! And this recipe is easy enough that older kids can make it themselves!
Why You’ll Love Homemade Granola Bars
- Wholesome & Homemade: These granola bars are made with simple, nourishing ingredients—no preservatives or mystery additives.
- Easy to Customize: Mix in your favorite nuts, seeds, dried fruit, or chocolate chips to make them just right for your family.
- Perfect Grab-and-Go Snack: Great for lunchboxes, busy mornings, or an afternoon pick-me-up you can feel good about.
Ingredients
- 1 cup butter, softened
- 1 cup honey
- 4 1/2 cups rolled oats
- 1 cup whole wheat or spelt flour (I get bulk flour here or learn how to make your own flour)
- 1 tsp baking soda
- 1 tsp vanilla (learn now to make homemade vanilla extract)
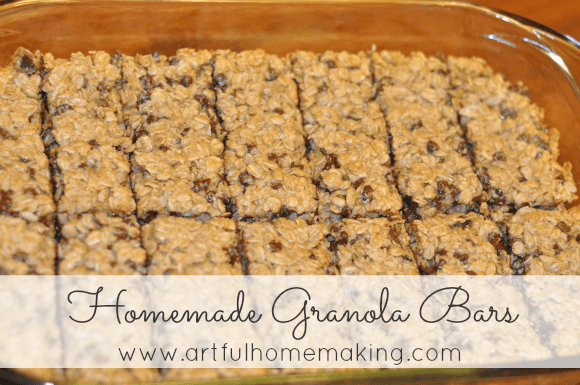
- 2 cups of add-ins of your choice. You can use mini semi-sweet chocolate chips, chopped walnuts, dried fruit, sunflower seeds, coconut, etc. (Be creative and add whatever you want! For the batch pictured above, I used semi-sweet chocolate chips, coconut, and sunflower seeds.)
How to Make Homemade Granola Bars
Here are the step-by-step instructions for making this recipe:
- Preheat oven to 325 degrees. Grease a 9″x13″ glass baking dish with butter.
- In a large mixing bowl, combine butter and honey and mix well (I just use a plastic or wooden spoon to mix.)
- Add the oats, flour, baking soda, and vanilla and mix well.
- Stir in the add-ins by hand.
- Pour the mixture into the baking dish and press it firmly into the pan (and you can even use your hands for this part!).
- Bake at 325 degrees for 15-20 minutes or until golden brown. They won’t look or feel “done,” but instead they will still be very moist. Don’t worry, they’ll harden as they cool.
- Allow the bars to cool for at least 10 minutes before cutting into bars. Let them cool completely before removing and serving. They can be stored at room temperature or you can even freeze them for later use.
Note: If you want your granola bars crispier, slice the fully baked bars and spread them apart slightly on a cookie sheet. Bake them again at 200 degrees for 30-60 minutes until crispy but not browned.
Absolutely! You can swap in your favorite nuts, seeds, dried fruit, or chocolate chips to make them perfect for your family.
They can be stored at room temperature for a few days, but keeping them in the refrigerator helps them stay firm and fresh longer.
Yes! These granola bars freeze well and can be thawed as needed for an easy grab-and-go snack.
This recipe comes from The Family Camping Handbook. I altered the directions a bit, and the photo is mine.
This is just one of quite a few great recipes from The Family Camping Handbook that I plan to use when we go camping!
More Snack Recipe Inspiration
- Chocolate Oatmeal Bars
- Sourdough Chocolate Cookies
- Easy Healthy Homemade Granola
- Pumpkin Pie Granola
- Peanut Butter Cookies
If you make this recipe and enjoy it, please leave a comment with a 5-star recipe rating and let me know! Thank you!

Homemade Granola Bars
Ingredients
- 1 cup butter, softened
- 1 cup honey
- 4 1/2 cups rolled oats
- 1 cup whole wheat or spelt flour
- 1 tsp baking soda
- 1 tsp vanilla
- Add ins of choice, mini semi-sweet chocolate chips, chopped walnuts, dried fruit, sunflower seeds, coconut, etc.
Instructions
- Preheat oven to 325 degrees. Grease a 9″x13″ glass baking dish with butter.
- In a large mixing bowl, combine butter and honey and mix well (I just use a plastic or wooden spoon to mix.)
- Add the oats, flour, baking soda, and vanilla and mix well.
- Stir in the add-ins by hand.
- Pour the mixture into the baking dish and press it firmly into the pan (and you can even use your hands for this part!).
- Bake at 325 degrees for 15-20 minutes or until golden brown. They won’t look or feel “done,” but instead they will still be very moist. Don’t worry, they’ll harden as they cool.
- Allow the bars to cool for at least 10 minutes before cutting into bars. Let them cool completely before removing and serving. They can be stored at room temperature or you can even freeze them for later use.
Notes
Nutrition
Nutrition information is automatically calculated, so should only be used as an approximation.


Hi! Thanks for sharing your recipe. I don’t have any wheat flour? Any good substitutions for it or can I use regular white flour (I have this on hand). Thanks!
Hi Jenny! I think regular white flour should work just fine. If you try them, let me know how they turn out!
We love granola bars, but I have never found a recipe that really works for us – I typically end up making granola instead 🙂 I think I will give this one a try! Would love for you to share it at what i am eating https://www.townsend-house.com/2013/05/what-i-am-eating.html
Hope you like this one, Heather, we love it! I just linked up, thanks for inviting me. 🙂
Those look delicious. I was going to whip up a batch of granola tomorrow and think I will try these as well. DD LOVES granola bars. Thanks.
-Amanda
Hope you enjoy them, Amanda! My children think they're wonderful, especially when they have chocolate chips in them! 🙂